Updated: October 14, 2024
By Drew Schiavone
firewood

Contemporary wood-heating devices vary widely, from stand-alone stoves for small spaces to installations that function like mini district heating plants for central heating and domestic hot water. When designing and installing a wood heating system, prioritize energy efficiency improvements to reduce overall heating demand. A well-insulated, draft-free building can be heated effectively with a smaller unit compared to a poorly insulated one with gaps and cracks. Implement energy conservation measures before investing in a wood-burning device, as wood is primarily used for space heating. Proper insulation and air sealing are crucial to minimize the size and cost of the heating system. Before installing wood heat, understand the home’s energy use and air flow. Consider the size of the space, the heating duration, and the frequency of use of the wood combustion unit. Ensure the heat source (combustion unit) and the home interact as a system. For example, the home’s air tightness and availability of combustion air will affect the unit’s ability to draft and burn properly.

Understanding Wood Energy

Heat Transfer

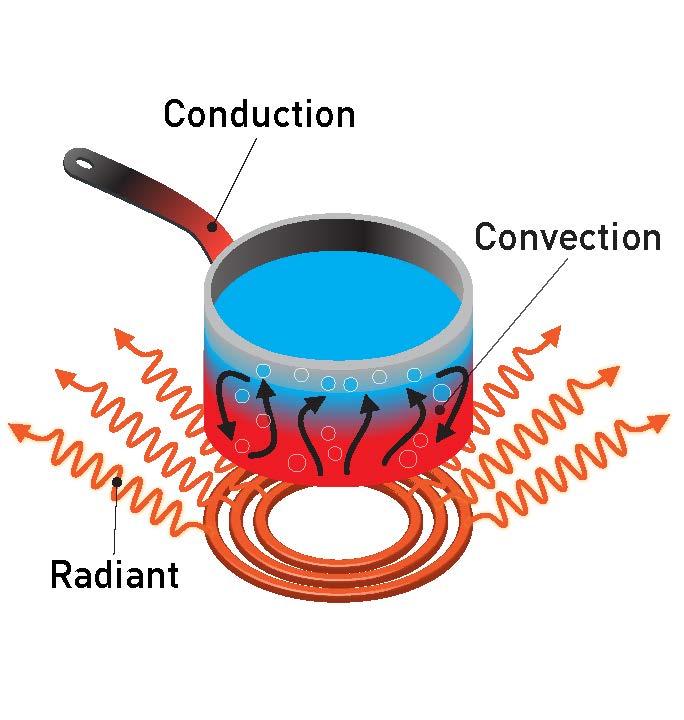
Wood heating, a form of thermal energy, involves the motion of atoms and molecules. Wood heating systems transfer energy through radiation, conduction, and convection.

  • Radiation: Heat moves as electromagnetic waves through empty space.
  • Conduction: Heat energy transfers through solid matter from warmer to cooler areas.
  • Convection: Heat transfers through the movement of fluids (like air). Warm air rises as it becomes less dense, while cooler, denser air sinks, creating circulation.

The information in this article will cover how combustion units are designed to transfer heat and considerations for improving thermal energy efficiency in design and installation.

conduction convection radiation heat transfer from water pot

Key Terms

  • Room/Area Heat: Heats a single room or adjacent area without ducting/piping. Examples include wood stoves, pellet stoves, and fireplaces.
  • Central Heat: Uses ducting and blowers or piping and pumps to distribute heat throughout a building. Typically installed in basements, utility closets, or separate outbuildings.
  • Hydronic: Heats a liquid (water or antifreeze) that is piped to provide heat and hot water to buildings like homes, barns, and greenhouses.
  • Single Fuel: Generates heat from one type of fuel.
  • Flex Fuel: Can use various similar fuels, such as wood pellets and corn.
  • Multi Fuel: Can use different types of fuels, like wood, coal, and oil.
  • Cordwood: Traditional firewood, cut, split, and stacked.
  • Pellets: Small, compacted wood residues, often made from sawdust. In some regions, agricultural waste and dedicated energy crops are also used to make pellets.
  • Wood Chips: Chipped wood, typically used on a commercial or industrial scale.

Technologies

Wood Stoves

Modern, high-efficiency combustion systems are designed to burn all combustible components (solids, gases, and tar droplets) before they exit the appliance. Key features include:

  • Airtight doors for controlled air supply.
  • Firebox insulation to maintain high combustion temperatures.
  • Preheated primary air to avoid cooling the fire.
  • Preheated secondary air introduced through small holes in the gas-burning zone.
  • Internal baffles to ensure gases follow a long, hot path for complete combustion.

Wood Burning Systems

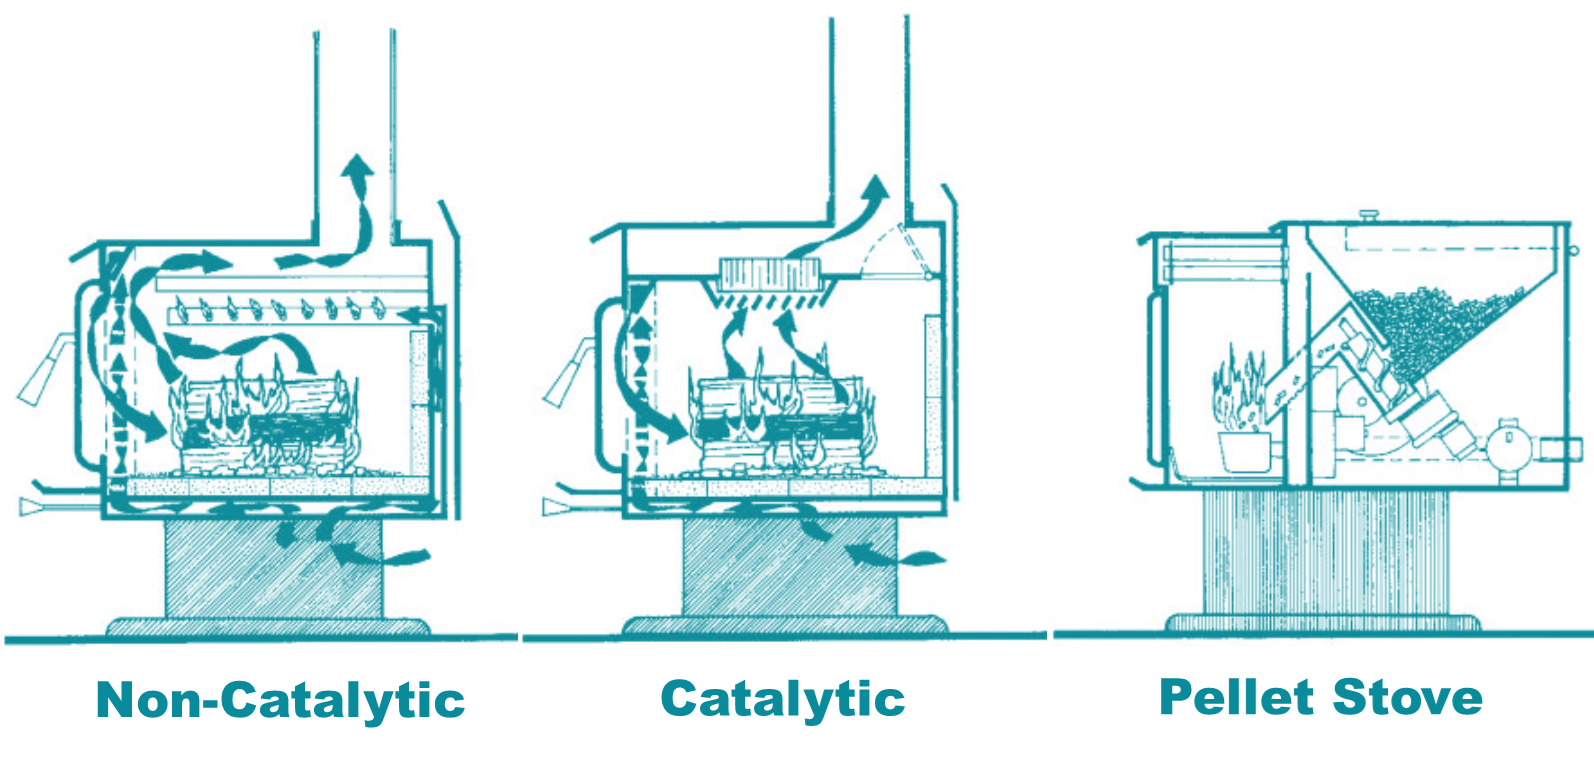
Non-Catalytic Wood Stoves: These stoves function like a campfire in a box, using pre-heated air along a serpentine path in the combustion chamber for optimal fuel-to-heat conversion. They are simpler, have fewer and cheaper parts, and require less maintenance. However, they have slightly lower efficiency, a narrower range of optimal firing rates, and shorter burn times compared to catalytic stoves.

Catalytic Wood Stoves: These stoves use a catalyst to increase surface area and lower the ignition temperature of wood smoke from about 1100°F to 500-550°F. They offer higher efficiency, longer burn times, and cleaner burning at lower temperatures. The downside is the need to replace the catalyst every 600 hours, costing $100-$200, and the slightly more complex operation compared to non-catalytic stoves.

non-catalytic, catalytic, and pellet stove illustrations

Pellet Stoves

Pellet stoves, similar in size to wood stoves, use compressed pellets made from wood or other biomass (plants, agricultural waste, or vegetation) as fuel. They feature mechanical fuel-delivery and ash disposal systems, sensors to control air intake, and can be either fireplace inserts or free-standing units. The controlled air intake ensures a clean burn, producing minimal smoke and creosote, which is the main cause of chimney fires.

Pellet stoves are categorized into two types based on pellet delivery systems:

  • Top-fed units: Have a hopper that is manually refilled with bagged pellets.
  • Bottom-fed units: Automatically feed pellets into the stove.

Unlike wood stoves and fireplaces, pellet stoves require electricity to operate but are easier to use and maintain. They eliminate the need for cutting, hauling, splitting, stacking, or drying wood, though they do require purchasing pellets.

Boilers

Boilers

There are two main types of wood-fired boilers:

  • Standard Hydronic Heaters (Outdoor Wood Boilers): These heat water or glycol, which is circulated through pipes to heat spaces or into a heat exchanger in a forced-air system.
  • Two-Stage Gasification Boilers: These can use cord wood or pellets and vary widely in emissions, efficiency, cost, and heat output.

Outdoor Wood Boilers (OWBs)

Outdoor Wood Boilers (OWBs)

While often marketed as clean and economical, outdoor wood boilers (OWBs) can be among the dirtiest and least efficient heating methods if misused. Some OWBs have design flaws that result in high emissions and low efficiency. They typically feature a large firebox surrounded by a water jacket, which is often poorly insulated, and low chimney stacks that cause exhaust to linger near the ground.

Currently, there are no national emissions standards for OWBs. Improper use, such as burning wet wood or inappropriate fuels, can result in emissions up to twenty times higher than those from an EPA-certified wood stove. To maximize efficiency and minimize emissions, OWBs should be used with dry wood and adequate air intake.

The EPA has a voluntary program encouraging manufacturers to produce cleaner, more efficient units, but many polluting boilers remain on the market. Exercise caution when purchasing and installing these systems. EPA Phase 2 cleaner burning hydronic heaters qualify for the EPA’s Voluntary Hydronic Heater and Fireplace Programs, with a standard of 0.32 pounds of fine particles per million BTU of heat output and a maximum individual test run of 18.0 grams per hour. For a list of cleaner hydronic heaters, visit EPA’s website.

Two-Stage Gasification Wood Boiler

Two-stage gasification combustion systems are significantly more efficient and cleaner-burning than single-stage systems. Combustion begins with gasification, where wood or other materials are heated to release volatile gases, which then burn. In single-stage systems, many gases escape up the chimney before fully combusting, leading to higher emissions and lower efficiency.

In two-stage combustion, wood or pellets are heated in one chamber with limited oxygen, releasing gases into a second chamber where fresh air is injected. This results in nearly complete combustion at higher temperatures than standard wood stoves, pellet stoves, or traditional outdoor wood boilers, achieving emissions of less than 1 gram of particulates per hour. European countries lead in developing and using these boilers, many of which are available for import. Additionally, several domestic companies now produce very clean-burning, highly efficient units.

Thermal Storage

Many boilers use thermal storage to enhance efficiency by reducing on-off cycling. These systems typically include large, insulated buffer tanks that store heated water before distributing it throughout the building. Without thermal storage, the heater would need to activate frequently to meet demand, causing frequent cycling. With thermal storage, the boiler runs for extended periods to heat a large volume of water, then shuts down while the stored heat meets demand. This approach significantly increases efficiency and reduces emissions.

Other Masonry

Masonry Heaters

Masonry heaters are distinguished by their large amount of stone, bricks, or refractory material and an internal system of channels for hot flue gases. These features make them highly efficient and clean-burning.

Masonry heaters have a firebox for burning wood but take a long time to heat up due to their large thermal mass. This mass retains heat for extended periods, providing comfortable, even warmth with one or two short, intense fires per day. The exterior remains warm to the touch, unlike the hot surfaces of wood stoves. Some masonry heaters also include built-in cooking compartments, ideal for baking bread or making stews.

Masonry Heaters

Masonry heaters are more expensive, larger, and heavier than other heating options. They require substantial reinforcements if not built on the house foundation, necessitating a structural engineer. Custom masonry heaters can cost between $15,000 and $30,000, while kits for the heater core start around $5,000.

Fireplaces & Inserts

Fireplaces: Conventional fireplaces are typically masonry or metal boxes with a flue and chimney. They are inefficient because they cause conditioned room air to vent out the chimney and combust fuel inefficiently.

Fireplace Inserts: These are wood stoves modified to fit within a masonry fireplace. Inserts consist of a firebox surrounded by a steel shell, which warms air from the room. This design ensures most heat is delivered to the room rather than escaping up the chimney. However, inserts are generally only about 50% as efficient as wood stoves.

Implementation

Criteria

Today, a wide variety of wood burning devices are available, with significant improvements in design and technology over the past two decades. This publication discusses the differences between EPA-certified and non-certified wood heating systems, applicable to both cordwood and pellet stoves, though some characteristics are specific to the fuel type. Here are some common terms found in manufacturers’ brochures and on appliance labels.

Performance

Manufacturers provide performance parameters and ratings as both consumer information and marketing tools. Understanding this information is crucial in the decision-making and purchasing process. Performance parameters for wood burning appliances are often presented similarly to EPA fuel efficiency ratings for vehicles. However, not all data in product brochures are standardized or regulated.

The EPA certifies emission rates and high/low BTU output ranges for wood stoves, which is useful but not easily comparable across different models due to variability. EPA approval indicates that a model has met certain standards in an EPA-certified laboratory, but real-world performance may differ.

Other performance parameters in product literature may include efficiency, heat output, heating capacity, and burn time. These parameters are not standardized or regulated, so manufacturers may define them differently. Therefore, using these ratings to compare models should be approached with caution. While these numbers provide initial information, they should only be part of the selection criteria. A reputable dealer can recommend the right stove for a specific situation and ensure consumer expectations are met.

Example of performance parameters a consumer might find in a product brochure.
Stove Model Peak
(btu/hr)
Max Burn Time
(hr)
Firebox Capacity
(cu ft)
Max Log Length
(in)
Emissions
(g/hr)
Efficiency
(%)
Model A 40,800 7 - 9 1.46 16 2.1 78.5
Model B 51,100 10 - 12 2.0 18 / 16 (ideal) 1.1 77.2
Model C 56,000 12 - 14 2.4 20 / 18 (ideal) 1.1 79.5


Efficiency

Efficiency ratings for wood burning units can be ambiguous due to the complexity of assigning a single efficiency number. There are two main measures: combustion efficiency, which indicates how completely the wood burns, and heat transfer efficiency, which measures how much energy is transferred to the heated space. These measures are influenced by factors such as the timing of wood burning and whether the wood is properly seasoned.

EPA certification of wood burning appliances provides a good efficiency guideline. While it primarily assesses compliance with particulate emission limits, higher overall efficiency is correlated with lower emissions. An overall efficiency between 60% and 80% is considered reasonable. Below 60%, too much energy escapes up the chimney, while above 80%, the low exhaust temperature can lead to weak drafts and increased risk of water vapor condensation in the chimney.

Heat Output

Heat output is typically listed as maximum heat output in British Thermal Units per hour (BTU/hr), ranging from 25,000 to 80,000 BTU. However, running a wood or pellet stove at maximum output for prolonged periods can damage the unit. More valuable heat output numbers for consumers are the high and low BTU output ranges, reported on the EPA label. These ranges indicate how much heat a unit can produce and how low the temperature can go while still burning cleanly. A unit with a broad range can be used comfortably throughout more days of the heating season. As with all numbers, these ranges are estimates of real-world conditions.

Heating Capacity

Heating capacity, typically given as the square footage a unit can heat, is a subjective measure due to various non-stove-related factors. These include climate zones (e.g., California vs. Michigan), insulation levels, air tightness, floor plans (open vs. fragmented), ceiling height, and the type of wood used. These variables make manufacturer-provided ratings highly variable and less reliable as a decision-making tool.

Burn Time

Burn time, or how often wood needs to be added to the firebox or the hopper reloaded on a pellet stove, is crucial for consumers but often not clearly stated. Burn time depends on three main factors: fuel quality (type and moisture content of the wood), heat demand, and the size and orientation of the firebox. For example, dry Ponderosa pine with an open vent provides moderate heat for several hours, while Douglas fir offers twice as much heat. A closed air supply vent can extend burn time to over 8 hours but with less heat output.

Other features, such as catalytic stoves, can also influence burn time by allowing lower burn rates over longer periods. Fully automatic pellet stoves with thermostats may only need a hopper refill once a day, depending on heating demand and hopper size.

To navigate these variables and choose the right stove, consult a reputable dealer for advice on different manufacturers and models. If possible, seek references from current wood stove users for their feedback.

Installation

Proper installation of a wood-fired heating system is crucial for safety and efficiency. Improperly installed wood burners and chimneys are significant fire hazards. Most states have fire code standards for stove installation, typically enforced by local building code officials. Always adhere to the manufacturer’s instructions and state and local building codes, especially regarding clearances from combustible surfaces.

Professional assistance is recommended for selecting and installing a wood-fired heating system. The following guidelines are general and not exhaustive. Refer to your owner’s manual and local building codes for detailed information. When in doubt, consult a professional wood stove installer.

Location: Place your stove in a frequently used, central area like the living room or family room. Ensure the structural support under the floor is adequate. The most efficient location is the center of the room for even heat distribution. Avoid placing the stove in a closet or alcove. Ensure it is safe from combustible surfaces and does not obstruct the home’s traffic flow.

Installation: Maintain proper clearances between the stove and surrounding surfaces to prevent fire hazards. Consider heat transfer from the stove, stovepipe, and chimney.

Clearances from Combustible Materials: Noncombustible materials include steel, iron, brick, tile, concrete, slate, and glass. Walls with wood framing, plaster, and sheetrock are combustible. Prolonged heat exposure lowers the ignition temperature of combustible materials. Ensure adequate clearance from combustible materials like joists, rafters, and wall studs. If unsure, assume walls and ceilings are combustible and maintain proper clearance.

Flooring: Noncombustible floors include concrete, slab-on-grade, or solid concrete with steel or concrete supports. An existing masonry hearth extension is noncombustible if no wood forms are left below it and if there is at least 18 inches of hearth extension in front of the loading door. Wood floors, carpets, and synthetic materials are combustible and must be protected appropriately. Other combustible materials include furniture, draperies, books, and clothing.

All stoves and stovepipes must maintain a minimum clearance from unprotected combustibles on all sides and above the stove. Building codes specify these clearances to prevent overheating and ensure safety. The required clearances can be found on the certification label or in the manufacturer’s installation instructions.

For uncertified stoves, the minimum clearances are substantial: 48 inches for radiant stoves and 36 inches for stoves with convection jackets. If no instructions are available, follow state building codes and use the clearances listed here as a guide. EPA-certified stoves have specified clearances that vary by construction. If a stove lacks a certification label, it is not EPA-certified, and some insurance companies may not cover it. Improper installation can also void your insurance policy in case of a fire.

No clearance is needed for stoves or stovepipes adjacent to noncombustible walls (e.g., concrete), but allowing at least six inches for air circulation and heat dissipation is advisable.

Clearances for Wood Stoves and Stovepipes:

  • Follow state and local building codes and manufacturer’s instructions. Use the larger clearance if there is a discrepancy, but never go smaller than recommended.
  • Maintain a minimum 36-inch clearance from unprotected combustibles above and on all sides of the stove.
  • A single-wall stovepipe requires at least an 18-inch clearance from combustible walls and ceilings, measured at right angles to the pipe.
  • The only acceptable base for a stove without special protection is a noncombustible floor or a properly built hearth extension, extending at least 18 inches on all sides of the stove.

Protected Walls and Ceilings

A wood stove and stovepipe can be placed closer than 18 inches to a combustible material if protected by an approved clearance-reduction system. The two common types are:

  1. 24-gauge sheet metal (galvanized steel, aluminum, or copper)
  2. 3-1/2-inch-thick masonry wall (4-inch nominal)

Both materials must be spaced one inch from the combustible surface, creating an air gap. For sheet metal, use noncombustible spacers to maintain this gap. For masonry walls, use metal wall ties and furring strips if needed. Ensure the air space is maintained around the entire perimeter to allow heat dissipation and prevent fire hazards. Do not place spacers or wall ties directly behind the stove or stovepipe. Without this air space, the protection is ineffective.

Protective or Clearance-Reduction Systems

A clearance-reduction system creates a ventilated airspace between a heat source and combustible material, spaced one inch from the combustible surface. This reduces heat transfer, allowing for reduced clearances. Prefabricated clearance-reduction systems are available from wood stove and fireplace dealers. Ensure the system is safety-listed and designed for use with a wood stove, and follow the manufacturer’s installation instructions.

The system should be centered behind or above the stove and stovepipe to protect the wall or ceiling. It should extend at least 36 inches past the stove in height and width, measured diagonally. If the stove is placed farther from the wall than the minimum required distance, measure from the stove’s side and top edge to the unprotected wall to determine the system’s dimensions, ensuring at least 36 inches. Larger distances between the stove or stovepipe and the wall require smaller clearance-reduction systems.

Some manufacturers may specify greater clearances. For detailed clearance requirements, contact your local fire marshal’s office.

Floor Protection

All combustible floors must be protected. The only base for a stove without special protection is a noncombustible floor or a properly built hearth extension. Manufacturers of listed stoves usually specify the required floor protection material. If not specified, you can use safety-tested and listed prefabricated stove boards.

Requirements:

  • Floor protection should extend at least 18 inches in front of the loading door to prevent damage from sparks, embers, ash, or radiant heat.
  • It should also extend 18 inches or more on the remaining sides of listed stoves, unless the manufacturer specifies a greater amount.
  • Unlisted stoves require at least 18 inches of floor protection on all sides, including the loading and ash doors.

If multiple stove boards are needed, join them using a safety-tested and listed stove board adapter or a strip of 24-gauge sheet metal, 4 to 6 inches wide.

Stove Leg Length:

  • Less than 2 inches: Use floor protection as specified by the manufacturer, safety-tested and listed prefabricated stove boards, or a noncombustible floor.
  • 2 inches or greater: You may use a combination of sheet metal and masonry.

Arrangement:

  • Legs 2 to 6 inches: Floor protection can consist of 4-inch (nominal) hollow masonry for air circulation, covered with 24-gauge sheet metal. An additional masonry layer can be added for aesthetics.
  • Legs higher than 6 inches: Use closely spaced masonry units of brick, concrete, or stone, at least 2 inches thick, covered by or placed over 24-gauge sheet metal.

Ensure each stove leg has a firm, solid footing.

Chimneys and Stovepipes

The chimney is the driving force behind a wood-fired heating system, working in a feedback loop with the stove or fireplace. Heat in the chimney creates a draft, pulling in more combustion air, which makes the fire burn hotter and delivers more heat to the chimney, enhancing the draft further. An insulated chimney generates more draft with less heat.

Chimneys for wood stoves must meet “all fuel” or “Class A” standards and should follow these design guidelines:

  1. Located inside the heated space rather than on an outside wall.
  2. Taller than the building.
  3. Penetrate the building envelope at or near its highest point.
  4. Straight up, with no elbows or offsets.
  5. Insulated around the flue liner.
  6. Flue sized to match the stove.

Chimney height is crucial for proper draft and fire code compliance. The chimney should extend at least three feet above the roof exit point and be at least two feet higher than any part of the roof within ten feet. This is known as the “3-2-10 Rule.”

Stack Effect or “Cold Hearth Syndrome”

When the stove is not in use, a house taller than the chimney can create a stack effect, where warm air rising in the house creates a slight negative pressure at the stove level. If the chimney is shorter than the house, it cannot compete, causing the flow direction in the chimney to reverse and pull cold air and potentially exhaust into the house.

The 3-2-10 Rule

To ensure proper draft, the chimney must extend at least three feet above the roof and be at least two feet higher than any part of the roof within ten feet, measured horizontally. If the chimney is more than ten feet from the roof ridge, use the following formula to calculate the required height:

(roof slope x distance to ridge) + 2 feet = required height above the roof

For example, a chimney on a 5/12-slope roof located six feet from the ridge requires:

(5/12 x 6 ft) + 2 ft = 4 ft, 6 in above the roof

Chimney Connector (Stovepipe)

The chimney connector, commonly known as the stovepipe, links the stove to the chimney. It can be constructed with either a single or double metal wall, with double-wall construction offering better protection and often required by home insurers.

Key Guidelines:

  • Prohibited Areas: The stovepipe must not pass through walls, ceilings, attics, closets, or any concealed spaces.
  • Fire Safety: Most house fires related to wood heaters originate around the chimney or stovepipe. Causes include creosote buildup, proximity of metal chimneys to combustibles, chimney failure, improper construction or deterioration of masonry chimneys, and incorrect installation of the stovepipe.

Safety Precautions:

  • Consult Authorities: Before installation, contact the fire marshal and local building code officials for safety guidelines and inspection requirements.
  • Optimal Length: The stovepipe should be as short as possible, with installations up to five feet being acceptable.
  • Design Considerations: Aim for a vertical stovepipe with minimal horizontal sections and elbows to ensure the best draft and reduce creosote buildup.

Thimbles:

  • Usage: Use a metal or fire clay thimble when passing a stovepipe through noncombustible walls. The thimble should be cemented into the masonry chimney and extend to the inner face or liner without protruding into the chimney.
  • Installation: Insert a short section of stovepipe, crimped on both ends, into the thimble and secure it with high-temperature sealant. The stovepipe should extend as far as possible into the thimble without sticking out into the chimney.

Class A Chimney:

  • Requirement: For venting through combustible walls, a “Class A” chimney is required. Once the stovepipe connects to the chimney, it must remain a chimney from that point onward, with no further use of stovepipe allowed.

Masonry vs. Metal Chimneys

Choosing between a masonry or metal chimney involves several considerations, each with its own advantages and disadvantages.

Metal Chimneys:

  • Cost and Installation: Generally less expensive and easier to install in existing homes.
  • Insurance: Some insurance companies may not cover homes with metal chimneys, so check with your insurer before installation.

Masonry Chimneys:

  • Construction: Typically require an experienced mason and are often built during the construction of the house.
  • Cleanout Opening: Must have a cleanout opening for creosote removal, located more than two feet below the stovepipe entry port, made of ferrous metal, and equipped with an airtight door.
  • Chimney Cap: Often added to prevent rain entry, with options ranging from flat steel or concrete plates to more decorative ceramic and metal caps.
  • Durability and Aesthetics: Highly durable and often considered more attractive. They also store and release heat longer after the fire has subsided.
  • Disadvantages: More expensive to build, harder to inspect and maintain, and less efficient if built on exterior walls due to heat loss and creosote buildup.

Safety Considerations:

  • Structural Integrity: Must withstand years of use and occasional chimney fires, with temperatures reaching up to 2,700°F.
  • Air and Draft: Ensure the stove has adequate air for combustion and proper draft.
  • Condition Check: Inspect for loose bricks and mortar cracks. Have a competent mason repair any issues or add a chimney liner if necessary.
  • Compliance: Older chimneys may not meet “all fuel” or “Class A” standards but can be made safe with safety-listed liners.
  • Flue Requirements: Each wood-burning appliance must have its own flue. Seal any unused entry ports or breachings with masonry and fire clay mortar to ensure safety.

By considering these factors, you can choose the chimney type that best suits your needs while ensuring safety and efficiency.


Chimney Inspection and Cleaning

Regular inspection and cleaning of chimneys are essential to prevent deterioration and creosote buildup. Even well-built chimneys can settle and require repairs over time, while poorly built chimneys pose immediate dangers.

Inspection Frequency:

  • Inspect and clean chimneys at least once a year.
  • If using your wood stove daily, inspect and clean as often as biweekly.
  • Disassemble and inspect the stovepipe regularly.

Creosote Management:

  • Creosote deposits should not exceed one-quarter inch in thickness on the chimney or stovepipe.
  • Inspect the flue at both the stove end and chimney top, as cooler surfaces near the top will have the thickest deposits.

Cleaning:

  • You can hire a professional or clean the chimney yourself.
  • If cleaning yourself, wear protective gear (mask, goggles, gloves) and use a quality steel-bristle brush.
  • Clean the inside of the stove and stovepipe as well.
  • If you suspect leaks or cracks, have a professional perform a leak test and repair any issues immediately.

Annual Inspection:

  • Chimneys passing through attic areas must be inspected annually for cracks.

Combustion Air

State and local building codes may require an outdoor air inlet to ensure adequate combustion air. The size, design, and location of the inlet depend on various factors, such as chimney type and height, and stove heating capacity. Consult your building code officials for specific requirements.

Importance of Outdoor Air Supply:

  • Without an outdoor air supply, the stove will draw air from the room, potentially causing dangerous back drafting of gases and smoke.
  • Inadequate combustion air can also cause central furnaces or water heaters to backdraft toxic gases.

Design Considerations:

  • Some wood stoves draw outdoor air directly into the stove, ensuring adequate combustion air and reducing unwanted infiltration.
  • For new homes built to meet energy codes, an air inlet is necessary.
  • Proper design is crucial to avoid issues such as back drafting, especially if the intake is on the downwind side of the house during severe weather.
Operation

Burning wood involves three key steps that occur both sequentially and simultaneously within a piece of wood:

  1. Water Evaporation: Properly dried firewood has a moisture content below 20%. Before the wood can release and ignite combustible gases, the water must be evaporated. Wet wood consumes more heat energy for drying, leading to poor combustion, increased smoke and creosote production, and premature aging of catalytic converters in some wood stoves.

  2. Smoke Formation: Wood smoke is essentially fuel. As wood heats up, its solid and liquid components turn into vapors, forming a cloud of combustible gases and tar droplets. With sufficient heat and air supply, these gases and tar ignite, producing a bright flame. Visible grey smoke from a chimney indicates pollution and wasted energy from unburned vapors. A hot, efficient fire produces minimal smoke.

  3. Charcoal Formation: After all gases and tars are burned off, charcoal remains. This nearly pure carbon burns easily, hot, and virtually smoke-free, provided there is enough air. Starting and maintaining a low-emission fire requires skill. Fine, dry wood heats to ignition faster than large chunks. At around 1,000°F, wood burns cleanly and efficiently, needing sufficient oxygen—hence, dampers should be fully open during start-up. Only burn dry, well-seasoned wood. Green or wet wood, paper (except a few sheets of newspaper for starting a fire), cardboard, and garbage compromise efficiency and increase emissions.

Primary/Secondary Air System:

Modern wood-burning units typically use a dual-stage combustion process. Primary air is supplied directly to the fuel source through grates or air vents to enable gasification. Secondary air, which is pre-heated, is injected into the smoke to allow for nearly complete combustion. Primary air is user-controlled, while secondary air is regulated by the chimney’s draw.

Hazards of Burning - Creosote Deposits & Chimney Fires:

Creosote, a highly combustible by-product of incomplete combustion, can accumulate in flue pipes and cause chimney fires. It condenses on cooler surfaces like flue pipes and can ignite under the right conditions.

Precautions:

  1. Ensure the fire has sufficient air supply and maintains a high temperature.
  2. Burn only dry, well-seasoned wood.
  3. Maintain flue gas temperatures between 325°F and 400°F.
  4. Inspect and sweep the chimney at least once a year.
  5. Properly install flue pipe-mounted heat exchangers if used.

Backdrafting:

Backdrafting occurs when exhaust gases reverse direction due to negative pressure in the building or an improperly designed flue. This can be caused by powerful exhaust fans that require make-up air, which older, less airtight buildings could supply through gaps and cracks. Modern energy-efficient buildings may need additional ventilation to prevent backdrafting.

Precautions:

  1. Provide sufficient make-up air when using exhaust fans and other appliances.
  2. Ensure the chimney or flue system drafts properly; smaller diameter pipes tend to draft better.
  3. Watch for signs of back-spilling on other combustion units, such as dark soot streaks.
  4. Install CO detectors on every floor of your home, including the basement.

Carbon Monoxide (CO):

Carbon monoxide is a poisonous, odorless gas produced during most combustion processes. It forms when there is insufficient oxygen during the combustion of carbon-containing compounds like wood. CO can replace oxygen in your blood, leading to fatal consequences. It is colorless, odorless, tasteless, and slightly lighter than air.

Precautions:

  1. Ensure the fire has sufficient air supply for complete combustion. In the presence of oxygen, CO burns with a blue flame, producing carbon dioxide.
  2. Install CO detectors on every floor of your home, including the basement. Place detectors within 10 feet of each bedroom door and near or over any attached garage. Replace detectors every five to six years.

Hot Embers in Ash:

Hot embers can remain hidden in seemingly burned-out ashes. If these ashes are moved near combustible materials, they can reignite and cause damage or release CO.

Precautions:

  1. Carefully rake through the ashes to check for embers before disposal, or use them to kindle the next fire.
  2. Use only non-combustible tools, such as a small metal pail with a lid, to move ashes.
  3. Empty ashes into a metal garbage can stored outdoors away from combustible materials, or into a damp soil pit.

Fuel Type:

The type of wood burned significantly affects wood-burning systems. Very dense, dry wood with ample oxygen supply can overheat stoves and flue systems. If metal turns red-hot, the heat is excessive.

Precautions:

  • Take special care when burning pitchy wood (also known as “fat” wood), as it can cause excessive temperatures that may damage or burn through metal.
  • Always monitor the type of fire in your wood-burning device.

Wood Tips: Size, Moisture Content, Storage

A cord of wood, the standard measurement for firewood, is 4ft x 4ft x 8ft. Since most people don’t burn 4-foot-long pieces, fractions of cords, such as “face cords,” “stove cords,” or “furnace cords,” are often sold. These are piles of wood 4 feet high, 8 feet long, and as wide as the length of the individual pieces. When comparing firewood prices, convert face cords back to full cords.

Size of Firewood:

  • The most efficient firewood size for your stove depends on various factors, including ease of use and burn properties.
  • Length is typically determined by the firebox dimensions. Cut rounds a few inches shorter than the smallest dimension (length or width) to allow for flexible loading orientations.
  • Consider ease of handling. While longer pieces reduce reloading frequency, they can become cumbersome. Common lengths range from 12 to 20 inches.
  • Firewood can be split into various sizes, usually 3 to 6 inches in diameter. Different sizes help build and maintain fires according to changing heat demands. Smaller pieces ignite and burn more efficiently, while larger pieces are better for longer burn times between refueling

Drying Wood:

Burning wet or green wood leads to incomplete combustion, producing significant smoke, dangerous creosote deposits, and less heat. Green wood can contain up to 50% moisture by weight. Before any heat can be released, the energy stored in the wood is used to evaporate this moisture, wasting energy. For example, a small stack of properly seasoned pine firewood weighs about 40 pounds, with 20% moisture content meaning 8 pounds (or about a gallon) of this wood is water. Properly seasoned firewood, with less than 20% moisture content, burns more efficiently and produces less smoke and creosote.

To dry firewood effectively, the bark, which acts as a barrier to water loss, needs to be broken. Cut the wood to the desired length, split it, and stack it off the ground in freestanding single rows exposed to wind and sun. Well-dried, seasoned wood sounds hollow when tapped and has cracks on the grayish ends. Depending on weather and wood species, drying can take from 6 months to two years. Once dry, store the wood in a shed or other building protected from the elements but with some air circulation.

Moving Firewood:

Do not move firewood over long distances. Transporting firewood can spread tree-killing insects and diseases, such as the mountain pine beetle, Asian longhorned beetle, emerald ash borer, and gypsy moth. Even without visible signs, wood should not be considered safe to move. These pests can significantly damage forests and spread quickly. Many states have firewood movement restrictions, and it is generally advised to leave firewood at home. When buying firewood, ask the seller where it was sourced. If it is not nearby or the seller does not know, consider another dealer. As a rule of thumb, 50 miles is too far, and 10 miles or less is best. The closer the firewood is to the property where it will be burned, the better, including for camping trips.

Purchasing Wood Pellets

Quality wood pellets are a convenient and clean-burning fuel source suitable for automated fuel handling systems. They are typically available in 40-pound bags or in bulk and are produced under strict quality standards. These pellets are small, compacted pills made primarily of sawdust and a natural binding agent, lignin.

Characteristics of High-Quality Wood Pellets:

  1. Consistent Size: Approximately ¼ inch in diameter and ¾ inch in length.
  2. Low Moisture Content: Between 5-10%.
  3. Minimal Fines: Less than 1%, ensuring smooth flow and optimal combustion.
  4. Mechanical Durability: Able to withstand multiple handlings without breaking or producing fines.
  5. No Additives: Only lignin, a natural wood component, should be used as a binding agent.
  6. High Density: Highly compressed to minimize fines and ensure efficient burning.

High-quality wood pellets produce minimal ash, resulting in cleaner burns and longer intervals between ash pan cleanings. There are two grades of pellets available: “Standard” and “Premium.” Both have the same energy content per pound, but “Premium” pellets must have an ash content of less than 1%.

Storage Considerations: Due to their low initial moisture content, wood pellets are hygroscopic and can absorb moisture from humid environments. Proper storage in a dry area is essential to maintain their quality.

Explore other topics in this series:

Alternative Enegf

  • Wind turbines and solar panel

    Alternative Energy

    Overview of alternative energy sources in Maryland.

  • Smog coming from Power Station

    Carbon & Climate

    The impact of energy on greenhouse gas emissions.

  • Coal Generation Plant near bay

    Conventional Energy

    Overview of conventional energy sources in Maryland.

  • Electrical Outlet

    Energy Defined

    Types of energy generated and used in Maryland.

  • Energy Policy Word Cloud

    Energy Policy

    Maryland's energy goals and Renewable Portfolio Standard.

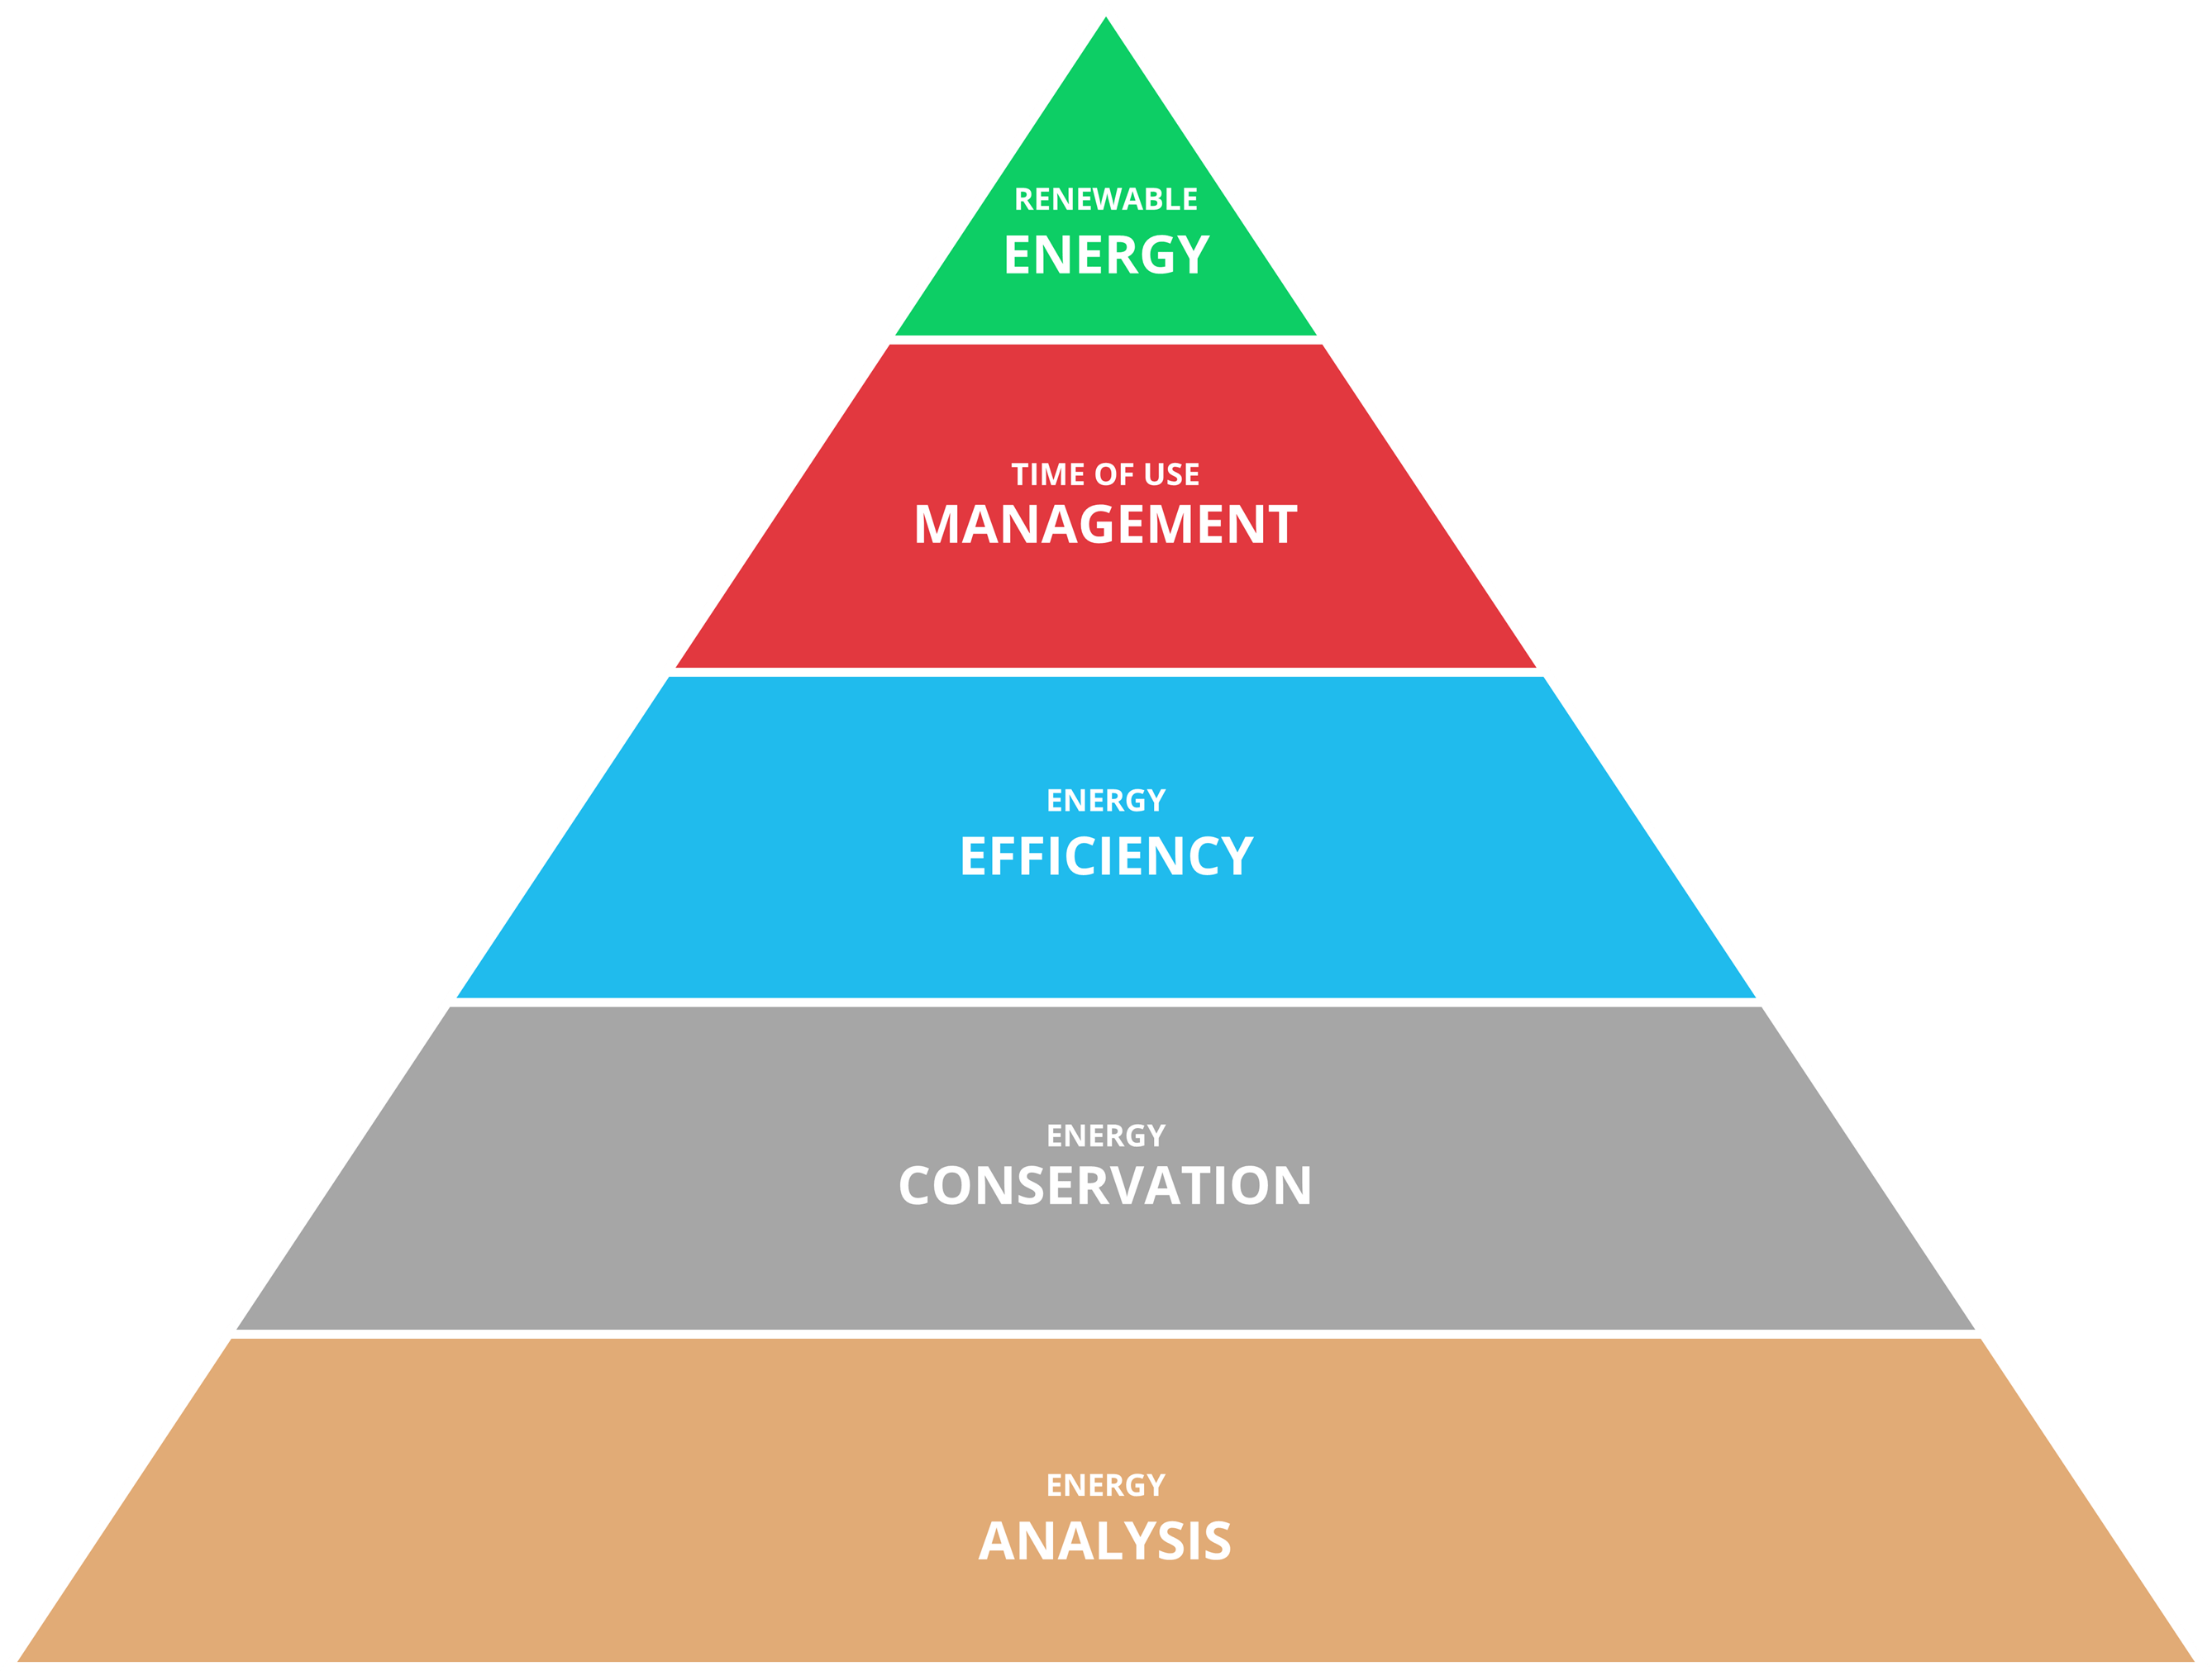
  • Energy Hierarchy Pyramid

    Energy Priorities

    Decision-making tool for energy saving measures.

  • Ground Source Heat Pump Tubing in Field Trenches

    Geothermal

    Explore geothermal heat pumps for your home, farm or business.

  • Water flowing in creek

    Hydropower

    Explore micro-hydropower for your home or farm.

  • Inflation Reduction Act Paperwork Stamped

    Inflation Reduction Act

    Save money and energy through the IRA.

  • Solar array in field

    Solar PV

    Explore solar PV for your home, farm or business.

  • solar thermal tubes

    Solar Thermal

    Explore solar hot water for your home, farm or business.

  • Wind turbine in overcast sky

    Wind

    Explore wind power for your home, farm or business.

  • firewood

    -- Wood --

    Explore wood heating for your home, farm or business.