
FS-1121 | January 2020
Care and Calibration of Injector Pumps
This fact sheet was developed to familiarize you with the care and upkeep of fertilizer injector pumps or proportioners and to discuss several methods of calibrating these pumps for effective and efficient application of nutrients and other material. Proper care and calibration will prevent under- or over-application of nutrients and other treatments needed for appropriate plant growth.
Injectors or proportioners are pumps which automatically mix dissolved concentrated materials like fertilizers or other chemicals into a solvent such as water. The material is injected into the water at a specific rate or ratio. For instance, at an injection rate of 1:50 the injector will pump 1 part of concentrated material into 49 parts water equaling a total of 50 parts of final solution. The concentration of the dissolved material can be by manipulated by adjusting the injection ratio setting. Often concentrations are expressed on a percentage basis or on a parts-per-million basis. This fact sheet will also familiarize you with these units and some mathematical procedures to help you calculate the correct injection rate.

Types of Pumps
There are several types of pumps with different modes of action. Some use water pressure, some use electric or have another source of external power.
Venturi-type Injectors
Venturi-type injectors are the most simple in design and work on the principle of pressure gradients and vacuums. Some examples include Hozon® injector (Figure 1), or a Mazzei® injector, often used to inject gasses like chlorine into irrigation water. Liquid enters the injector at a higher pressure than exiting, creating a pressure gradient and vacuum, enabling the passive injection of a concentrated stock solution to mix into the flowing clear water. For consistent injection ratios, these systems rely on constant pressure and water flow. They cannot deliver the same ratio at different pressures or flow rates so accuracy is harder to obtain if water pressure varies. Since injection ratios are usually low, large stock tanks are needed.
Positive Displacement Injector
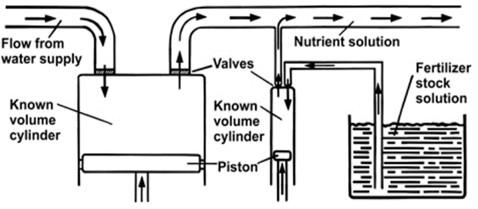
The most common injector type is the Positive Displacement Injector which include the Dosatron, DosMatic™, along with Anderson and Smith brands. Unlike venturi-type injectors, these can provide consistent injection ratios over wide variations of water pressures. Flow rate is controlled and determined by the size of the displacement piston. Different models of injectors can accommodate the wide range of flow rates desired for each setting. Figure 2 shows a schematic of a positive displacement injector.
These injectors have become the industry standard due to their range in injection ratios, their ability to precisely control the amount injected, the wide range of injection ratios, and the ability to use smaller stock tanks. Many operate without electricity, using water pressure to drive the displacement pistons. The injection system can be used where only a water source is available.
Parts of an Injector Pump
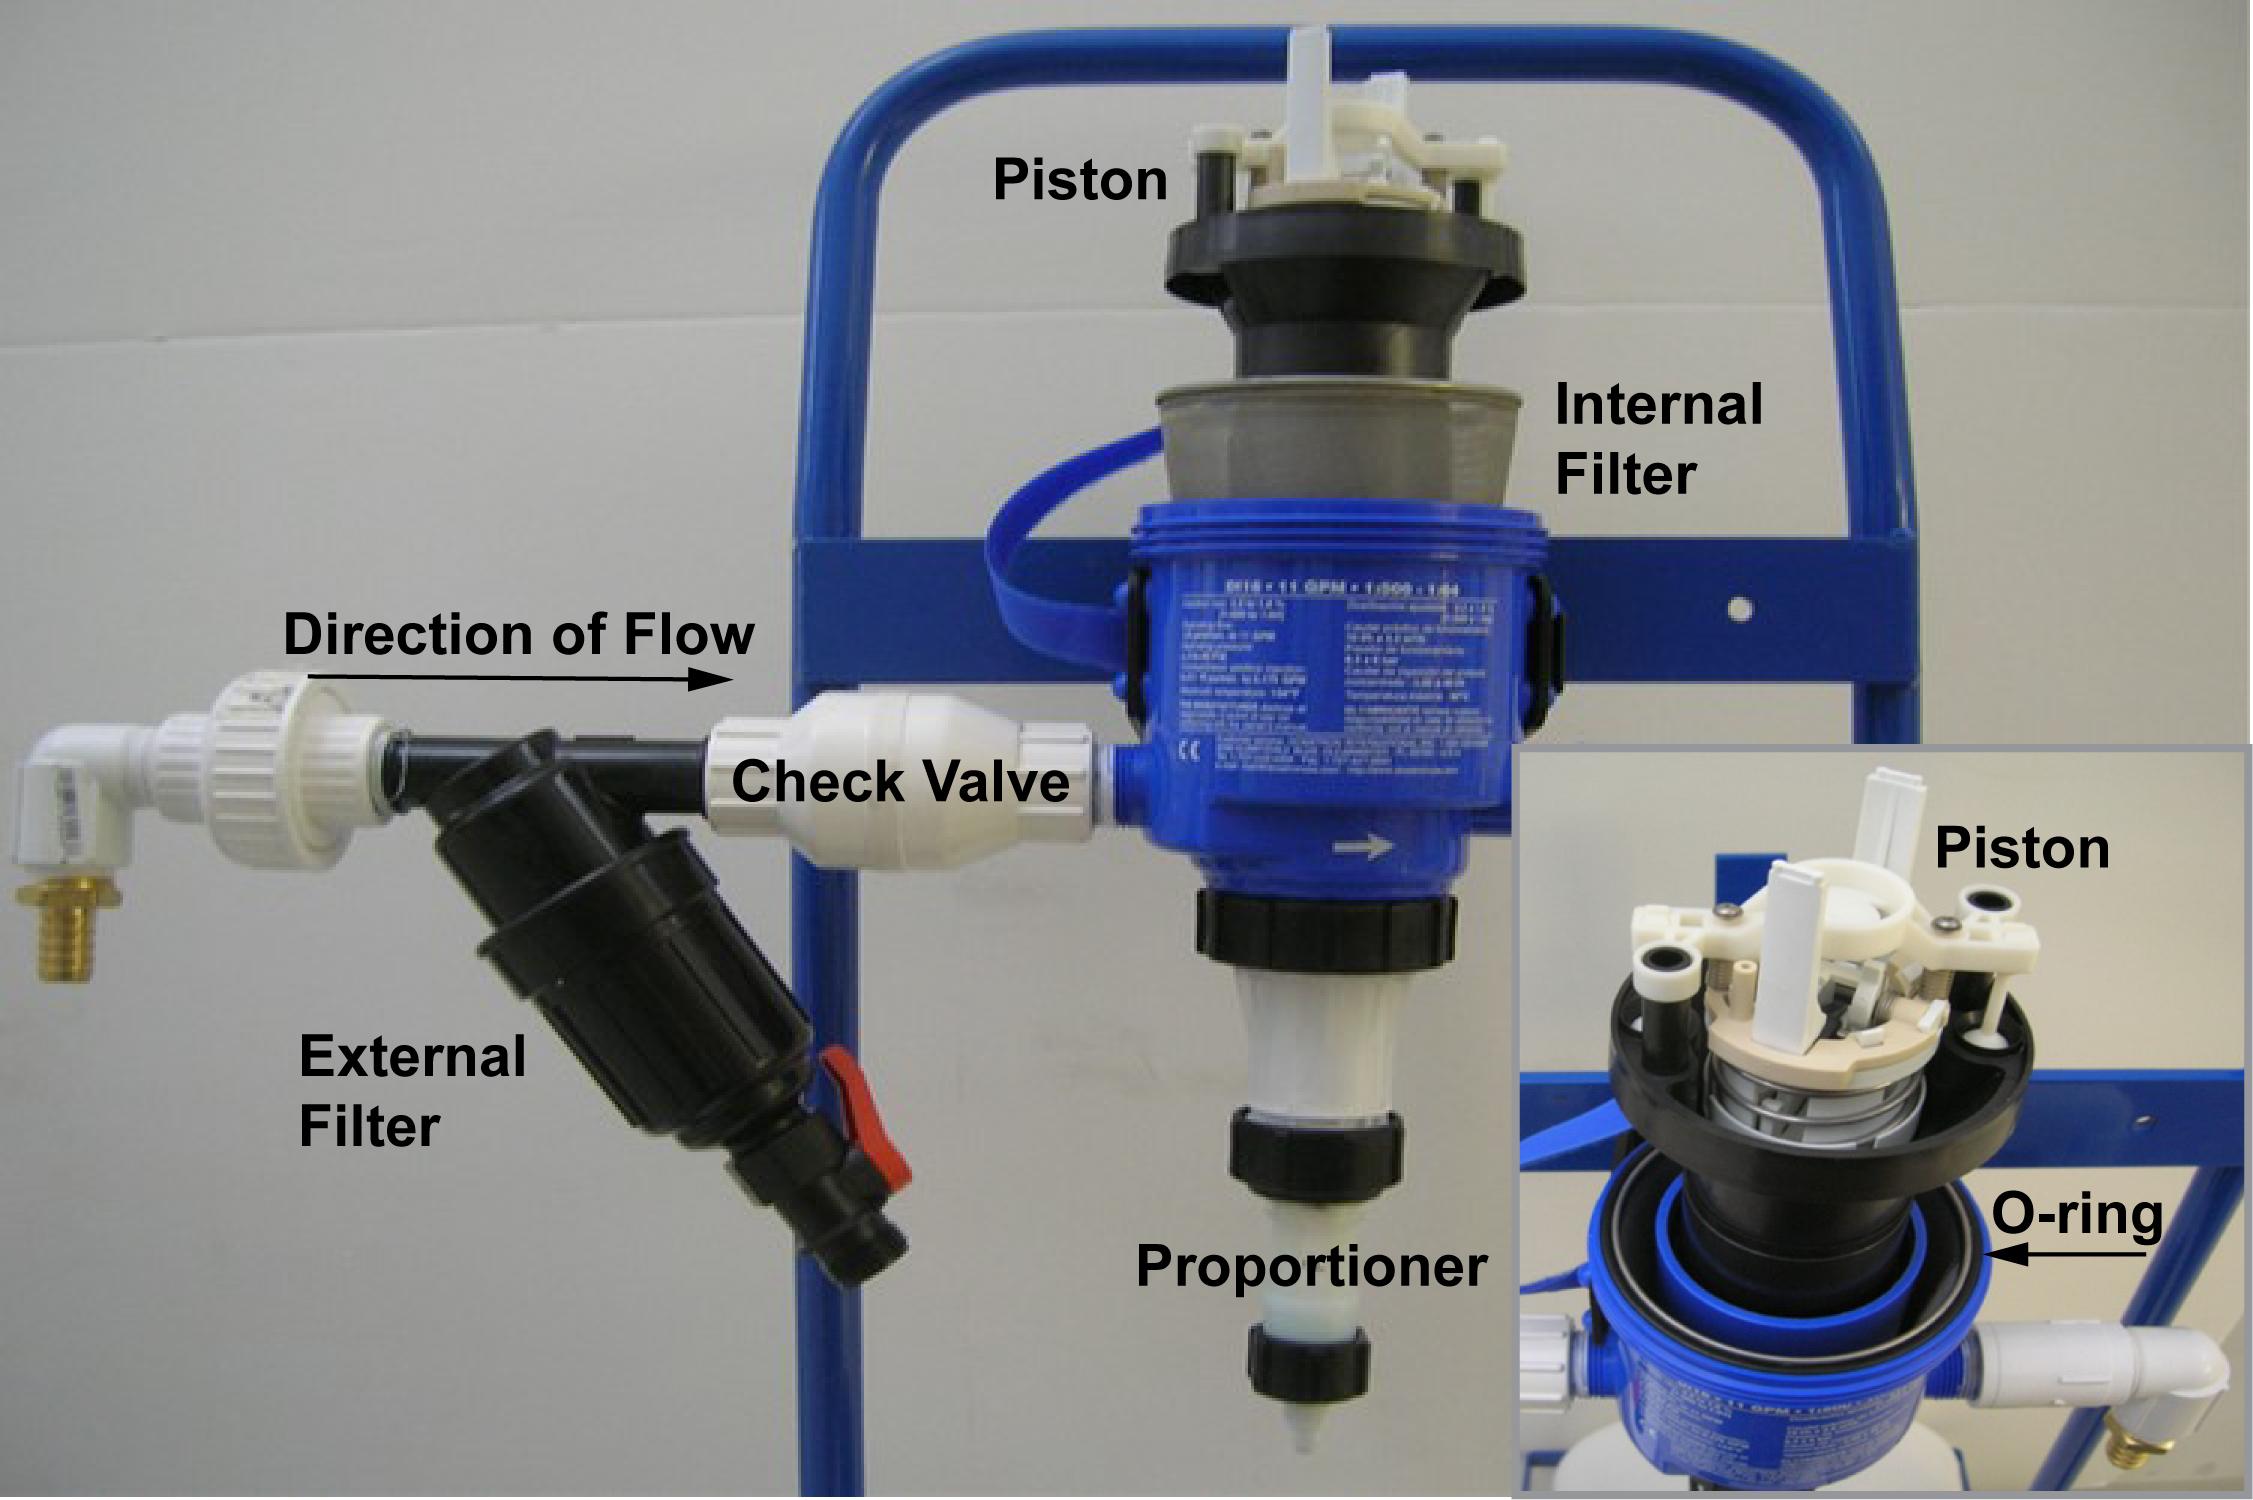
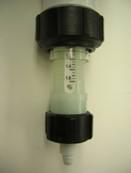
Figure 3 shows the various parts that you should know about your displacement injector system. Irrigation water flows from left to right. An external filter is necessary to filter any abrasive particles in the water before entering your pump. A check valve or back-flow preventer is placed in line between the filter and the pump. This is a one-way valve. It only allows water to move in one direction (an arrow on the valve should point to the pump) and prevents any fertilizer water from reversing direction back into your water source. In some jurisdictions, this device is mandatory. A piston within the body of the injector moves with water flow and draws the concentrate into the injector to be mixed with the water stream. An internal filter can be found on this model. O-rings can be found throughout the injector. The proportioner system (Figure 4) which allows you to adjust the rate of your fertilizer injection is located on the lower portion of the injector. For this model, proportion adjustments can be made by either % or by ratio.
Routine Maintenance
A poorly operating injector can over- or under-apply material that may waste material and money or cause damage to your plants. It is important to make sure that the injector is in good working order and is calibrated to assure a reliable concentration. There are several types of injector pumps and all have many working parts. You should inspect parts on a regular basis. Table 1 shows a basic maintenance schedule.
- Filters that are placed at the beginning of the hose located in your concentrate container should be inspected daily for clogging (Figure 5). Many soluble fertilizers have some insoluble ingredients that may plug your filter, slowing or preventing concentrate from properly being injected. You should consider input water quality when selecting the filtering system used on the fresh water line prior to entering the injector pump. If the pump has an internal filter, it should be checked weekly. Frequent cleaning of filters can prevent flow rate problems.
- O-rings used to seal parts tend to dry out and crack, creating leaks. The high salt or solvent concentrations can deteriorate O-rings and other rubber seals. They should be checked monthly. You can lubricate O-rings and seals with a silicon-based lubricant but never use petroleum jelly (ie: Vaseline®) because it can dissolve rubber. Abrasive materials in suspension may cause wear to pistons and seals over time.
- You should clean your stock tanks after each emptying to remove salts and insoluble materials that can build up over time. This material may be small enough to fit through the filters and cause internal wear of the injector.
|
|
Daily |
Weekly |
Monthly |
Yearly |
Other times |
|---|---|---|---|---|---|
| Check filters | * | * (internal) | |||
| Check O-rings | * | ||||
| Calibrate | * | or at least 2x per year | |||
| Stock Tank | * | before refilling |
Calibrating Injectors
Age and wear will affect your injector’s ability to function properly. Frequent injector calibration ensures that the correct amount of material is mixed with the water. There are two methods for calibrating injectors. The Dilution-Ratio Method or the Electrical Conductivity Method are effective and relatively easy for ensuring that your injector is functioning properly and giving you the correct injection rate.
The Dilution-Ratio Method
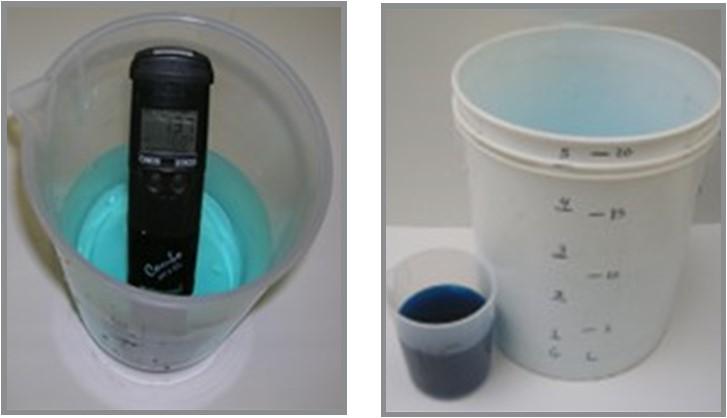
This method is the most simple and can be performed with the least amount of materials. The method calculates the fraction of injected liquid that flows into a known amount of clear water. You simply measure the amount of liquid injected from a container and the amount of diluted solution into a bucket, each with graduated volume measurements (Figure 6).
You will need the following materials:
- Five-gallon bucket (20L bucket).
- A measuring container with incremental volume measurements.
- Calculator.
To calibrate with the Dilution-Ratio method:
- Place the suction tube into the measuring container.
- Run the injector to purge air bubbles.
- Fill the measuring container to capacity and note total volume.
- Turn on water to the rate used in fertilization.
- Start collecting output into a five-gallon bucket.
- Stop the water flow when either
- the five-gallon bucket is full, or
- the measuring container is empty.
- Determine the amount used from the measuring container or the amount collected in the five-gallon bucket.
Use the following formula to calculate injector ratio:
Injector ratio=
Gallons of water collected * 128 ounces per gallon
Ounces of water used from measuring cup
EXAMPLE:
You have collected 5 gallons of water and used 10 ounces from the measuring cup
5 gal x 128 oz = 64
10 oz
The Ratio is 1:64
The Electrical Conductivity (EC) Method
With this method you will need an electrical conductivity (EC) meter. Each type of fertilizer has a specific EC based on the desired concentration. However, each type of fertilizer will have a different EC for the same application rate. You cannot use the same EC value for two different fertilizers even if you are mixing to the same concentration. For instance, a 20-10-20 at 200 ppm nitrogen will not have the same EC as a 15-7-12 at the same 200 ppm rate.
Most soluble fertilizers will have a table on the bag with dilution rates and a corresponding EC for each rate. Figure 7 is an example of such a table. There are several accepted units for electrical conductivity. The most common is the mho (pronounced mō). This unit is commonly found on bags of soluble fertilizer as mmhos/cm (milli mho per centimeter which is one thousandth of a mho). Another common unit is the Siemen (pronounced Sē-men). It is often used with these units; dS/m (deci Seimen per meter), mS/cm (milli Seimen per centimeter) or μS/cm (micro Seimens per centimeter).
Unit conversions
1 mmhos/cm = 1 dS/m = 1 mS/cm = 1000 μS/cm
|
Weight (In Ounces) of Product Needed To Mix One Gallon of Concentrate |
||||
| Target Fertilizer Concentration (ppm N) After Dilution | Injector Ratios | EC mmho/cm of Target Feed Rate After Dilution | ||
| 1:15 | 1:100 | 1:200 | ||
| 50 | 0.5 | 3.4 | 6.8 | 0.30 |
| 100 | 1 | 6.8 | 13.5 | 0.59 |
| 200 | 2 | 13.5 | 27 | 1.18 |
| 300 | 3 | 20.3 | 40.5 | 1.77 |
You will need the following materials:
- Electrical conductivity meter (calibrated according to manufacturer’s recommendations).
- Standard solution for calibration of meter.
- Plastic measuring cup.
To calibrate with the Electrical Conductivity Method:
- Run your water for at least 5 minutes with fertilizer injection turned off.
- Collect a sample of clear water in plastic measuring cup and measure electrical conductivity.
- Record the measurement.
- Begin fertilizer injection and let it run for at least 2 minutes.
- Measure the conductivity of the fertilizer solution.
- Subtract the electrical conductivity reading for clear water from electrical conductivity reading for the fertilizer solution.
- Record this number.
- Using the label from the manufacturer, compare the calculated EC reading to the target EC.
- Adjust the injector’s proportioner or the fertilizer concentrate. For instance, a higher calculated EC value than the target EC means your injector is injecting too much stock solution and the proportioner must be changed to add more clear water. The concentration stock tank can also be diluted.
- Retest the solution.
It is important to test the EC of your clear water first because it has naturally occurring conductivity from the dissolved minerals. This clear water EC value is subtracted from the EC of the fertilizer solution to accurately define the EC produced by the fertilizer alone (the specified EC on the label).
ᴱꟲfertilizer soln – ᴱꟲwater = ᴱꟲlabel
Using the fertilizer label, check the calculated electrical conductivity reading against the electrical conductivity value provided by the manufacturer’s bag label. For instance, if the irri-gation water EC is 0.25 mmhos/cm, and the mixed solution with a target nitrogen rate of 100 ppm is 0.84 mmhos/cm, the actual EC for the mixed solution is 0.84 – 0.25 = 0.59 mmhos/cm; right on target! Adjust injector or concentration in the stock tank accordingly.
Making the Stock Solution
Once the injector calibration is verified, you can calculate the amount of fertilizer or other material (nitrogen in this example) needed in a stock tank to deliver a certain concentration of material at a specific injection ratio. You need to know the following:
- The percent nitrogen in the fertilizer.
- Desired concentration of nitrogen in ppm (mg/l).
- The size of the stock tank.
- Use a conversion factor of 75 which converts milligrams to ounces and liters to gallons. Use the following formula to calculate the amount needed in the stock tank:
ppm or N needed x injection ratio
% N in fertilizer x conversion factor (75)
200 ppm x 100 = 13.3 oz/gal
20% x 75
Summary
Care and calibration of your fertilizer injectors is important for your plant’s health and your greenhouse or nursery business. Following a routine schedule of maintenance and calibration will ensure your injector is functioning properly. Be sure to keep records of all the maintenance and calibration results. In the long run, this best management practice will save you time and money and perhaps your crop as well.
Cited Literature
Cornell Controlled Environment Agriculture Working Group, Sailus, M., & Weiler, T. C. (1996). Water and Nutrient Management for Greenhouses. Ithaca, N.Y.: Northeast Regional Agricultural Engineering Service, Cooperative Extension.
ANDREW G. RISTVEY
aristvey@umd.edu
CHARLES F. SCHUSTER
cfs@umd.edu
This publication, Care and Calibration of Injector Pumps (FS-1121), is a part of a collection produced by the University of Maryland Extension within the College of Agriculture and Natural Resources.
The information presented has met UME peer-review standards, including internal and external technical review. For help accessing this or any UME publication contact: itaccessibility@umd.edu
For more information on this and other topics, visit the University of Maryland Extension website at extension.umd.edu
University programs, activities, and facilities are available to all without regard to race, color, sex, gender identity or expression, sexual orientation, marital status, age, national origin, political affiliation, physical or mental disability, religion, protected veteran status, genetic information, personal appearance, or any other legally protected class.