
EM-2023-0698 | October 2024
How to Build a Low-Cost, Small-Scale Aquaponic System
Introduction

In recent years, aquaponic systems have gained significant popularity among urban farmers requiring innovation to adapt to space and soil limitations that often restrict food crop production in urban areas (Blum, 2013). Aquaponic farming is a promising method for producing food in small spaces with minimal environmental impacts. Aquaponic farming can be achieved in controlled environments, like home basements, warehouses, and greenhouses, using a combination of artificial and natural light.
High start-up costs are a limiting factor for farmers interested in aquaponic methods when purchasing “turnkey” systems. However, do-it-yourself construction may save farmers money on startup costs and may provide a system with which they can learn and practice aquaponic methods before investing in larger or commercial scale systems.
The goals of this publication are to:
- Give a general overview of aquaponics and how it works.
- Outline some of the benefits and limitations of aquaponic methods.
- Describe the components of an aquaponic system and their function.
- Explain how to build your own system using a repurposed food grade IBC tote and other materials easily available; and
- List estimated costs of materials.
General overview of aquaponics
What is Aquaponics?
Aquaponics is a soilless farming method that combines aquaculture (fish production in a system that re-uses water) and hydroponics (vegetable production in a soilless environment). By combining the two methods (aquaculture and hydroponics), the user achieves a symbiotic or mutually beneficial system of plant and fish production.
How Aquaponics Works
Fish grown in tanks produce nutrient-rich waste that is filtered and pumped through a biofilter (a medium on which beneficial bacteria grow) that converts ammonia from the fish waste into nitrates (a natural fertilizer) that nourish the plants through their roots. In turn, the roots help to filter and purify the water so that fish can thrive. Aquaponics’ circular production system recycles nutrients and water, thus reducing wastewater and fertilizer costs.
Benefits and limitations of aquaponic methods
Benefits
- Aquaponic farming is a promising solution to space and soil and limitations.
- Aquaponics can produce high yield crops with limited space and water.
- In a controlled environment, aquaponic systems can provide a continuous production of food for plants.
- Because aquaponics reuses and recirculates water, wastewater and nutrient runoff from production are minimal. Reducing nutrient runoff is essential for maintaining the health of the Chesapeake Bay and safeguarding its ecosystem. This is vital for the region's well-being and prosperity.
- Nutrients for plants are provided by fish in the system, reducing the need for, and in some cases, eliminating chemical fertilizers and associated costs.
- Growing in controlled environments can reduce exposure to pests and diseases.
Limitations
- Involves high startup costs.
- Incurs ongoing electric and energy costs.
- Requires access to a clean water supply.
- Needs daily attention and regulation.
- Requires knowledge of fish, plants, and some plumbing.
- Requires a basic understanding of the nitrification cycle.
- Mistakes can be expensive.
Components of an aquaponic system

The following list of components is for a system containing grow media (see below). However, it is easily adaptable to a deep-water culture system. Deep water culture (DWC), or raft method, eliminates a grow media and suspends the plant roots directly in the water where they absorb nutrients and oxygen required for growth.
- Repurposed food grade 275-gallon Intermediate Bulk Container (IBC): The IBC will be repurposed as a fish tank and a grow bed for plants. (Figure 1)
- Grow media: Clay pebbles, expanded shale, volcanic rock (or any material that is locally available) holds plants in position and serves as a biofilter.
- Bell Siphon: The bell siphon is used to regulate the water level in the grow bed and provides an effect of ebb and flow between the grow bed and fish tank. (See Figure 2 and Figure 4).
- Bacteria: Beneficial bacteria are vital to the aquaponic process and essential for nitrification. Nitrifying bacteria convert the fish waste to fertilizer for plant crops. Establishing a beneficial system will require balancing fish input and bacterial colony development.
- Biofilter: A media where bacteria attach and grow to form a biological layer called biofilm (Figure 3). The biofilter hosts the nitrification process (converting ammonia and nitrites into nitrates) so that plants’ roots can access and absorb the nutrients from the natural fertilizer (converted nitrates).
- Pump: The pump moves water from the fish tank to the biofilter and/or to the grow bed.
- Plants: Plants provide food crops and filter water. During production, plant roots absorb the nutrients and help clean the water before it returns to the fish tank.
- Fish: Fish provide a food source for human consumption and produce waste that is converted into a nutrient rich natural fertilizer to grow the plants. A variety of cold water and warm water fish can be raised in an aquaponic system, yet it is important to keep in mind the stocking density requirements and behavior of the fish species under consideration. Finding a suitable fish for your operation will depend on many factors, including your tank size, distribution goals, accessible markets, and access to fish processing facilities. Before you decide to invest in a commercial scale system, conduct market research on what fish species are best for you. To learn more about fish species selection, read the Texas A&M Extension publication Aquaponics: Fish Species Selection (https://extension.rwfm.tamu.edu/wp-content/uploads/sites/8/2020/12/EHT-148-fish-selection-in-aquaponics.pdf).
- Fish Food: Fish food is a source of protein and nutrition for the fish. Like humans, fish need a balanced diet. Nutritional needs may vary by species, so it is important to conduct research to find the right feed to meet nutritional needs.
- Water: The fish tank holds around 250 gallons of water. Around 10% of water is lost by evaporation every week. Replenish the water with dechlorinated water. Once the system has fish in it, to refill the system, tap water needs to be dechlorinated before entering the system. The easiest method is using an additional container, like a 30-gallon drum, filled with tap water and adding an air bubbler to get rid of the chlorine. This process takes around 24 hours.
- Air: Critical for the functioning aquaponics system. Aquatic life and bacteria need dissolved oxygen to survive and multiply. An Air Pump pushes oxygen into the system and the Air Stone helps to circulate the oxygen and improves its availability to the fish.
- Electricity: An energy source to power the water and air pumps and grow lights (when needed).
- Grow lights: Light requirements will depend on the location of your system and the crops produced. Greenhouse production where plants are exposed to sunlight may only require supplemental lighting, while indoor production will require a more reliable and constant lighting system with adequate photosynthetically active radiation (PAR) for your plant crop. As a baseline requirement, vegetables need between 12 and 16 hours of light per day and at least 8 hours of darkness. Read more about types of grow lights in Kentucky State University’s publication, AQUAPONICS Production Manual: A Practical Handbook for Growers, pp. 47-48 and Understanding LED Wavelength for Horticulture (Edwin van der Zwart, Luminus Devices Inc.). The more exposure your system has to natural light, the more economical your production will be.
How to build your own system using a repurposed food grade IBC and tools needed for assembly.
See Table 1 for a complete list of material, units, quantities, and approximate prices.
To view a short video that summarizes this construction project, including step by step photos, please visit this link: https://youtu.be/QyQpf0cIpK0
Please note that the information in the video does replace the full directions provided in this manual.
Part 1 | Part 2 | Part 3 | Part 4 | Part 5 | Part 6
Part 1: Create the Tank and Grow Bed Frames:
A 275- gallon IBC is 48-inches long x 40-inches wide x 46-inches high and weighs 130 lbs. empty. The plastic IBC container comes encased in a metal cage with two bars across the top of the tank, one on either side of the cap. The discharge valve is at the bottom.
Parts:
- One 275-gallon Intermediate Bulk Container (IBC) Food Grade.
Tools:
- Marking Pen
- Torx bit screwdriver with ¼ inch bit
- Heavy duty plastic cutter shears or a small saw for cutting PVC
- 1 ⅓ inch saber saw or reciprocating saw rated for metal
- Grinder with cutting blade and grinding wheel
- Drill with ¼ inch bit
- Anti-rust paint
- Hammer
Personal Protection Equipment:
- Safety glasses
- Gloves
- Ear plugs
Steps:
- Remove the two plates on either side of the cage. These could be metal or plastic plates and will snap off. See photo 1.1.
- Mark a line around the circumference of the container, just under the second metal rung from the top of the IBC (around 12” from the top). See photo 1.2.
- Use a Torx/star bit screwdriver to remove the bolts that secure the bars across the top of the container. See photo 1.3.
- With another set of hands, position IBC on its side. Use shears or a small saw to remove the plastic rings shown in photo 1.4 around the two metal bars and the metal bars. Be careful not to remove or damage the cap. The cap will need to be closed securely to ensure the integrity of the grow bed once the container is converted.
- Separate the plastic container from the cage. See photo 1.5.
- To cut the cage, use a reciprocating saw with a metal cutting blade. Cut all vertical supports just below the second metal rung from the top of the cage. Wear protective gear. Wear safety glasses, gloves, earplugs, long pants, and long sleeves. Continue to cut until the cage is in two parts. The larger portion of the cage will become the tank frame and the smaller portion will become the grow bed frame. See Photos 1.6 & 1.7.
- Use a file or a grinder to smooth any rough edges from the cut areas on both frames. When operating the grinder, wear safety glasses, gloves, earplugs, long pants, and long sleeves. The metal shavings can be hot and travel several feet from the workspace. Be aware of your surroundings and make sure the area is clear. See photo 1.8.
- Spray all cut areas with anti-rust paint and put the smaller cage aside for later. Return to the larger frame. See photo 1.9.
- One the larger frame, use a screwdriver and a wrench to remove the screws and the nuts and bolts that hold the cage to its base. See photos 1.10 & 1.11.
- Flip the cage so the cut side is resting on the lip of the base or platform. Screw each bar (20 total) into the platform using ¼ x 1-inch self-tapping metal screws. Pilot holes help! Use a hammer as needed to secure a fit before securing each bar. See photos 1.12, 1.13, & 1.14.


Part 2: Create the Tank and Grow Bed:
Parts:
- IBC - Plastic container
Tools:
- Jigsaw
- Reciprocating saw
- Utility knife
- Dish soap, water, and sponge
- Four 12 oz cans of flat/matte spray paint (optional)
- Razor blade
- Safety gear
Personal Protection Equipment:
- Safety glasses
- Gloves
- Ear plugs
Steps:
- Return to the plastic container and position it on its side. Use the jigsaw to cut the plastic container along the marked line. Cut the sides first, leaving the corners uncut, to maintain structure, then cut the corners. See photo 2.1.
- Continue cutting until separated. The larger portion with the discharge valve will become the tank and the smaller portion will become the grow bed. See photo 2.2.
- Separate the plastic container after completing the cut. See photo 2.3.
- Use dish soap, water, and a sponge to clean the containers thoroughly, inside and out. Cleaning the tank ensures there are no trace materials from the previous cargo that can harm the fish. See photo 2.4.
- (Optional) If your system is going to be outside, dry both containers and apply flat/matte spray paint to the exterior sides of the containers only. This will eliminate algae from growing in the tanks. Be sure to wear protective clothing and eye wear. Apply the spray in a well-ventilated area (preferably outdoors). If spraying indoors, a breathing ventilator may be necessary; check the can’s label for directions. Spray as many coats as needed until the paint blocks the sun from reaching the inside of the containers. Cover the discharge valve on the bottom of the large container with plastic to protect it from the spray paint. Spray only the sides of the small container with the cap; do not spray paint the top because it will not be exposed to light. See photos 2.5 & 2.6.


Part 3. Assemble the Tank and Grow Bed:
Parts:
- Fish tank and grow bed
- Two pieces of 5ft 2-in x 4-in pressure treated lumber. The lumber will support the grow bed on the tank frame.
Tools:
- Tape measure
- Square
- Marking pen or pencil
- Circular saw
- Adjustable wrench between 6 and 10 inches
Personal Protection Equipment:
- Safety glasses
- Gloves
- Ear plugs
Steps:
- Use a tape measure, a square, and a marking pen or pencil to mark two 5ft 2in x 4in pieces of pressure treated lumber. The lumber will support the grow bed on the tank. See photo 3.1.
- Use a circular saw to cut the lumber. If your system will be outside, consider using a protective paint to reduce warping or bowing over time due exposure to the elements. See photo 3.2.
- When the paint on the containers is dry, carefully place the tank container (with the discharge valve at the bottom) inside the caged frame. This allows you to use the drain at the bottom of the container to drain the fish tank. Placing the tank container into the frame requires up to four people. See photo 3.3.
- Place the lumber on the fish tank about a foot apart and place the grow bed frame on top of the lumber. Position the grow bed frame off to the side of the tank, so that about a quarter of the frame is hanging off the side of the tank and so that you can easily access the fish tank. See photo 3.4.
- The cap on the grow bed may have loosened during construction. Before putting the grow bed in its frame, tighten the cap on the grow bed using an adjustable wrench for leverage. See photo 3.5.
- Carefully put the grow bed in the frame. See photo 3.6.
Your tank and grow bed are complete! See photo 3.7.


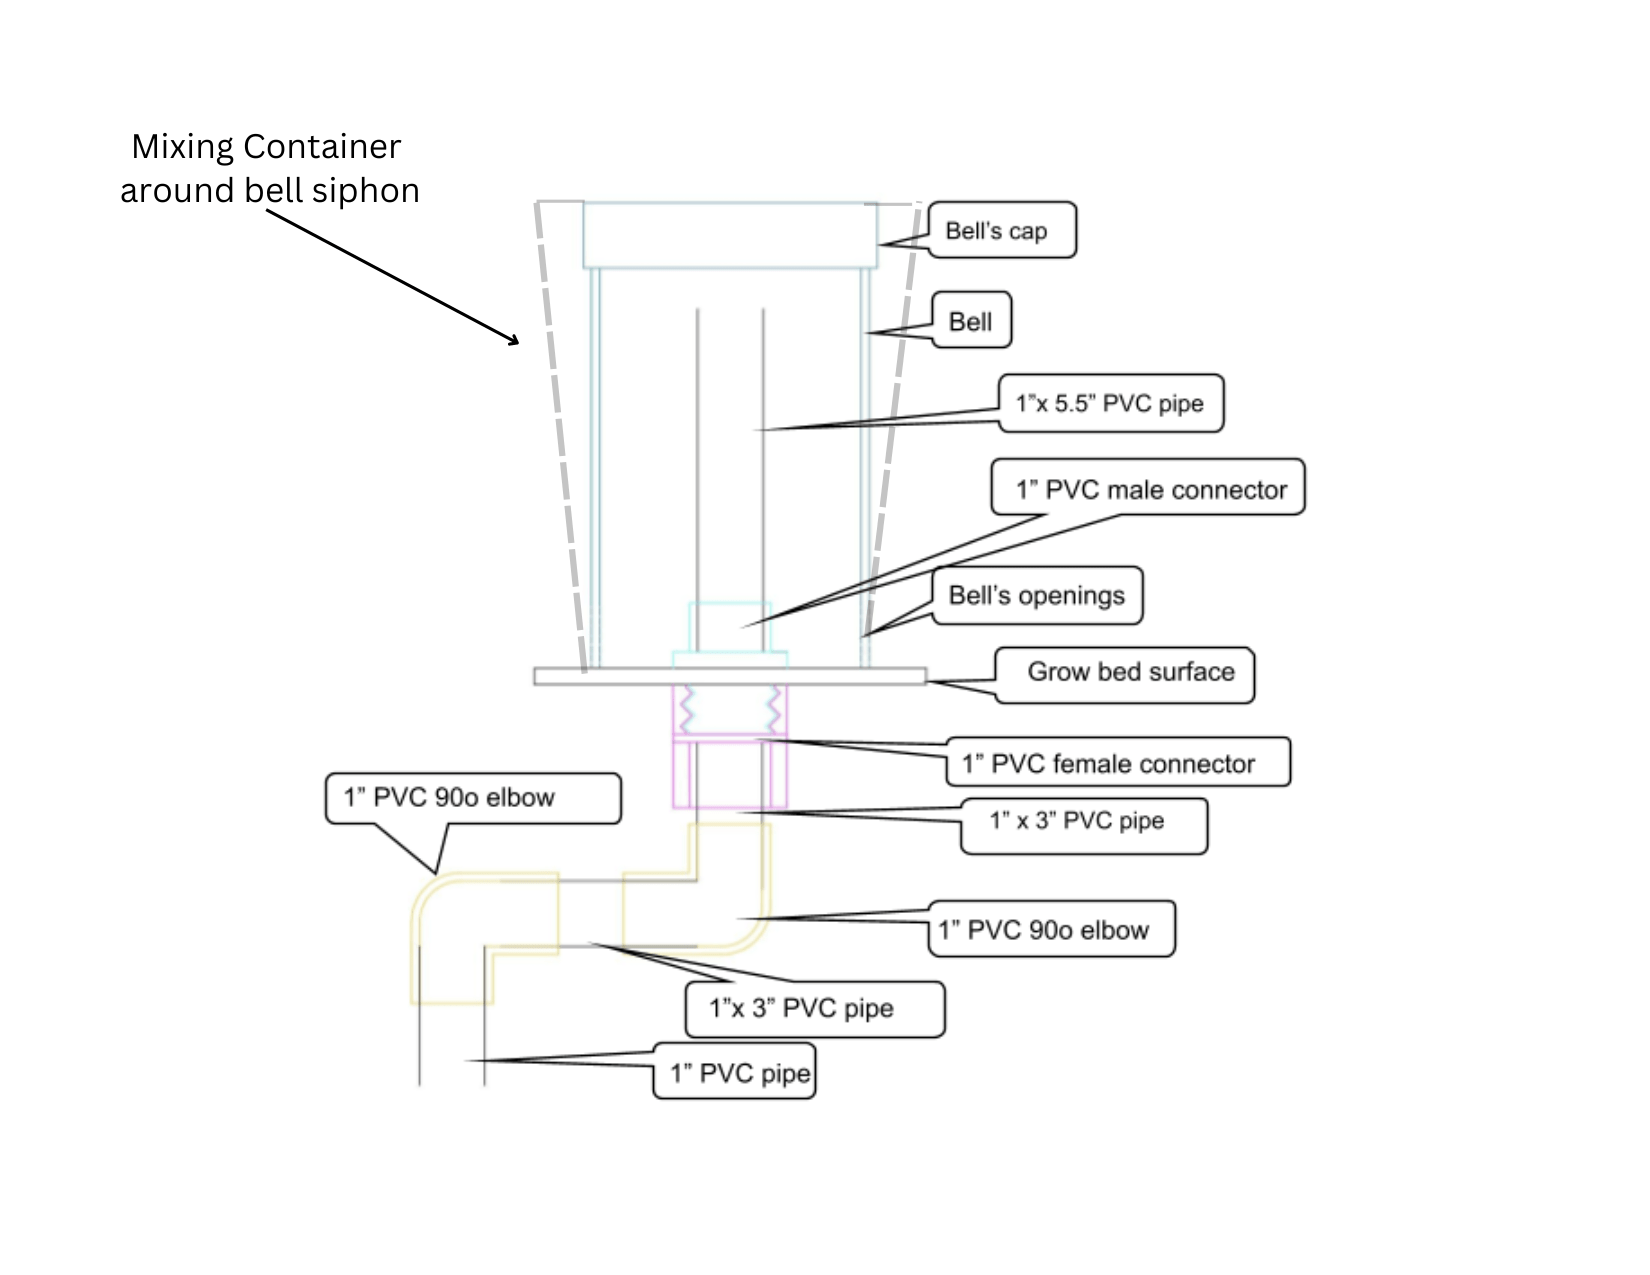
Part 4: Assemble the Bell Siphon:
Parts
- 5 qt plastic mixing container
- One 4-inch diameter PVC piping 8 inches long
- One 4-inch diameter PVC cap
- One 1-inch diameter PVC piping 5.5 inches long
- Two 1-inch diameter PVC piping 3 inches long
- One 1-inch diameter PVC female connector
- One 1-inch diameter PVC male connector
- Two 1-inch PVC 90-degree elbow
Tools
- Marking pen
- C-Clamp
- Drill
- ¼” drill bit
- ¾” Hole saw
- 2”x4” piece of wood (approximately 14” long)
- Utility knife (to clean plastic from holes)
- Two adjustable wrenches between 6” and 10” size
- PVC pipe cutter
- Razor blade
- Jigsaw
Personal Protection Equipment:
- Safety glasses
Steps:
- To create the Bell Siphon, start with a 5 qt plastic mixing container. Place on a flat surface. Mark vertical lines about 2 inches apart around the circumference of the container. See photo 4.1.
- On a steady surface, use the C-Clamp to clamp the 2-inch x 4-inch piece of wood (approximately 14-inches long) to the edge so that it extends from the steady surface. The 2-inch x 4- inch piece of wood is used as a surface area to drill holes into the plastic container. Place the open end of the mixing container onto the 2-inch x 4-inch piece of wood. Along the marked lines, drill 3/8-inch diameter holes 1 inch apart. You will have about 6 holes along each line. Water will be able to flow though the holes, but they are small enough to prevent the grow medium (clay pebbles or expanded shale) from entering the Bell Siphon. See photo 4.2.
- Use a utility knife or other sharp tool to clean the loose plastic created by the drill. See photo 4.3.
- Using a ¾ - inch diameter hole saw attachment, drill a hole in the center of the base of the 5 qt plastic mixing container. The resulting container will allow water to enter but will prevent growing media from entering and damaging the siphon. See photo 4.4.
- Find a corner on the grow bed that sits directly over the tank and position the mixing container flush on the surface and mark the center of the circle at the base of the grow bed with a marker or tape. See photo 4.5.
- Use a ¾ -inch diameter hole saw, to drill a hole in the grow bed and use a razor blade to remove loose plastic from the cut and discard all plastic residue. See photo 4.6.
- By hand, screw in the 1-inch PVC male connector until the lip is flush with the grow bed surface. See photo 4.7.
- Steady the male connector with an adjustable wrench while you tighten the female connector on the underside of the grow bed with a second adjustable wrench. You may need a second set of hands. See photos 4.8 & 4.9.
- Position the 5 qt plastic mixing container around the male connector, making sure the container is flush with the grow bed. Then attach the 1 by 5.5-inch PVC piping to the male connector. See photo 4.10.
- Construct the bell. Using a triangle and a marker, draw two small windows (2.5-inch-wide by 1-inch high) on opposite sides of the bottom of the 4-inch PVC piping. Make sure the cap is on the 4-inch PVC pipe. See photos 4.11 & 4.12.
- Using a jigsaw, cut along the mark. See photos 4.13 & 4.14.
- Position the 4 by 8-inch PVC bell over the 1 x 5.5-inch PVC pipe, making sure it is flush with the grow bed. See photo 4.15.
- To assemble the bell siphon drain, cut two pieces of 1-inch PVC 3- inches long each. Attach one of the pieces to the female connector on the underside of the grow bed. Attach a 1 inch 90-degree elbow to the end of this piece. Attach the other 1 by 3-inch PVC pipe to the end of the elbow and finally, secure the other 1 inch 90-degree elbow to the end. This is the drain for the bell siphon. Water that enters the bell siphon will drain back into the fish tank. See photos 4.16 & 4.17.


Boss
Part 5: Connect the Biofilter (including
the water pump):
Parts:
- Biofilter: POND BOSS Filter Kit with Pump, which includes filter, bio balls, and water pump (400 GPH). (Figure 3)
- ½ inch inner diameter x ⅝ inch outer diameter black vinyl tubing (4 ft)
- Stones for weight (you can find stones on the ground in your surroundings, or go to your local park)
- ½ inch PVC pipe (10 ft)
- ½ inch PVC 90-degree elbow (5 pieces)
- ½ inch 3-way split/threaded fitting
- ½ inch male barb connector
- Zip ties at least 6 inches long (8 pieces)
Tools:
- PVC pipe cutter
- Scissors
Personal Protection Equipment:
- Safety glasses
Steps:
- Make sure your biofilter kit include the bio balls (blue arrow), water pump with 16-ft power cord attached (red arrow), two sponge filters (green arrow), ½ inch male barb connector (purple arrow). Extra attachments are specific to ponds and are not needed for your system. See photo 5:1.
- Position the water pump inside the biofilter box and attach the black vinyl tubing. Depending on where your electrical outlet is you may need an extension cord. Do not allow the extension cord connections near water. See photo 5.2.
- Add stones for weight and bio balls to the biofilter box. See photo 5.3.
- Thread the tubing connected to the water pump through the center holes in the sponges. See photo 5.4.
- Thread the tubing through the hole in the lid and close the lid securely. See photo 5.5.
- Place the biofilter box inside the tank. See photo 5.6.
- As the water enters the biofilter, it will be pumped through the black tubing and dispersed through PVC piping that will drain into the grow bed. (Figure 4). First cut the ½ inch PVC pipe into three pieces: 1 piece cut 4 ft long and the other 2 pieces cut 3 ft long. The PVC pipe with frame a portion of the grow bed. Photo 5.7 and 5.8 are images of the end result. Notice where the biofilter tube is attached (green arrow). Attach the 4-ft long piece to the 3-way split, facing the front of the system (blue arrow), and attach a 90-degree elbow to the end of this pipe (red arrow). See photo 5.7.
- Attach the two 3 ft long pieces: one to the 3-way split (blue arrow) and the other to the 90-degree elbow (red arrow). See photo 5.8.
- Thread the barb connector into the ½ inch 3-way split/threaded fitting. Connect the ½ inch male barb connector to the end of the black tubing. The barb connection connects the biofilter’s black vinyl tubing to the PVC pipes via the 3-way split, which then disperses the nutrient rich water into the grow bed for plant root uptake. The nutrient rich water enters the grow bed from two sides, moving through the PVC piping and draining from the 90-degree elbows attached to the PVC piping (see photo 5.12). This ensures the water is distributed evenly to the plant roots. See photos 5.9 & 5.10.
- Attach a 90-degree elbow to the end of each 3 ft pipe (red arrow). Attach a 3-inch piece of ½ inch pipe to the end of each elbow (blue arrow). See photo 5.11.
- Finally, attach another 90-degree elbow at the end of each ½ inch PVC piece (red arrow). Use eight zip ties (at least 6 inches long) to secure the ½ inch pipes to the grow bed. See photos 5.12 and 5.13.


filters.

box lid.


⚠️ Implement Part 6 when you are ready to start using your system.
Part 6: Add the Grow Medium and Tank Water (including air pump and air stone):

Before adding water and the grow medium to the IBC system, place the system in your preferred location first. Once filled with water your tank will weigh up to 2,330 lbs. The additional weight of materials related to the aquaponic system, the grow medium, the plants, and fish require that the completed system should be placed only on a weight-bearing floor.
Parts:
- Grow medium - Clay pebbles or expanded shale (200 liter, approximately)
- Air pump – suitable for a 250 to 300-gallon system
- Air stone (1 Piece)
- Air tubing (minimum length 4 ft)
Tools:
- A container to wash the clay pebbles or expanded shale like a 5-gallon bucket with holes in the bottom or a wheelbarrow.
- Hose and access to water
Personal Protection Equipment:
- Mask
Steps:
- Add dechlorinated water to the tank. Fill until the water is a few inches from the top of the tank. The bottom of the grow bed should not be touching the water. When filling the tank for the first time, use tap water. Circulating the water without the fish for 24 hours will remove the chlorine.
- Wash the grow medium until the water drains clear and fill the grow bed with the medium. Wash small amounts of the grow medium at a time using a large strainer or bucket with holes at the bottom.
- Add the grow medium to the grow bed, making sure the cap of the bell siphon is above the grow medium fill line. See photo 6.1.
- Connect the air pump tubing to the air pump and to the air stone. The air pump will come with an electrical cord, but you may need to buy the air tubing and air stone separately.
- Place the air pump next to your system on a table or a shelf where it is protected from water exposure.
- Place the air stone, that is connected to the air pump by the air tubing, at the bottom of your tank (the tank will be filled with water). Air stones come in different shapes and the one you choose will depend on your preference. However, the air system (pump and stone) must be appropriate for your aquaponic system. For a 275-gallon IBC system, use an air pump for a 250 to 300-gallon system. See photos 6.2, 6.3, & 6.4. 7.
- Add fish and plants. Photo 6.5 below is an example of a completed and working indoor aquaponics system with fish, plants, and grow lights.


List and Costs of Materials
Many materials can be found at your local hardware store. Below is a list of potential suppliers for materials not sourced through hardware stores.
*The University of Maryland College Park and The University of Maryland Extension do not endorse or dissuade any particular manufacturer mentioned in this document.
Repurposed IBC
Research is required to locate repurposed IBC totes. We suggest looking on platforms like craigslist, ebay, or Facebook Marketplace. You can also call DeliBrands America to purchase a repurposed IBC at their location in Baltimore. New IBC can be ordered through Amazon or Home Depot.
- Maryland Used IBC Totes
https://reusedusa.com/buy-ibc-totes - Delibrands of America
https://delibrandsofamerica.com
Grow Media
- Horticulture Source Hydroton Original 50-liter bag https://www.horticulturesource.com/fresh/product/mother-earth-hydroton-giant-50-liter
- Hydro Crunch Expanded Clay Pebbles
https://www.bfgsupply.com/order-now/product/0/590947/hydro-crunch-50l-clay-growingmedia-8mm-pebbles
Air pump
- Tetra Whisper UL Air Pump for Aquariums
- AQUANEAT Aquarium Air Pump 300GPH (comes with air stones) https://www.amazon.com/dp/B0CGHFNFCH
Biofilter Kit
- POND BOSS Filter Kit with Pump
https://www.amazon.com/dp/B0068MW50M - Total Pond Universal Pump Filter Box
https://www.amazon.com/dp/B004DL0Y2Q
Air Stone
- Hydrofarm Active Aqua
https://www.amazon.com/dp/B00564IT5S - VIVOSUN Air Stone
https://www.amazon.com/dp/B01MV5C1I4 - Aquacave Long Cylinder Air Stone
https://aquacave.com/1-dia-x-2-long-cylinder-air-stone-lot-of-10-great-for-aquaponics-hydroponics-aquarium-amp-pond.html
| Item | Unit | Qty. | Price (Approx., 2023) | ||
|---|---|---|---|---|---|
| Each | Total | ||||
| Repurposed IBC 275 gallons - Food grade | Unit | 1 | $65.00 | $65.00 | |
| Treated Wood 2"x4"x 5' | Unit | 2 | $5.00 | $10.00 | |
| Biofilter Kit | Biofilter (Water pump, bio balls, sponges ½ inch black flex tubing) |
Unit | 1 | $75.67 | $75.67 |
| Stones for weight | Unit | 2 | $0.00 | $0.00 | |
| ½ inch PVC pipe (10 ft) | Unit | 1 | $4.26 | $4.26 | |
| ½ inch PVC 90-degree elbow | Unit | 5 | $0.71 | $3.55 | |
| ½ inch 3-way slip/threaded | Unit | 1 | $2.58 | $2.58 | |
| ½ inch male barb connector | Unit | 1 | $3.00 | $3.00 | |
| Air Pump (150 gallons) | Unit | 1 | $74.60 | $74.60 | |
| Air Stone | Unit | 1 | $6.00 | $6.00 | |
| Air Tubing (4 ft) | Piece | 1 | $3.00 | $3.00 | |
| Grow Media | Clay pebbles or expanded shale (Hydroton 50-liter bag) | Unit | 4 | $37.36 | $149.44 |
| Bell Siphon | 4-inch PVC 8 inch long | Unit | 1 | $4.00 | $4.00 |
| 4-inch PVC cap | Unit | 1 | $3.67 | $3.67 | |
| 1-inch PVC female connector | Unit | 1 | $0.87 | $0.87 | |
| 1-inch PVC male connector | Unit | 1 | $0.87 | $0.87 | |
| 1-inch PVC 90-degree elbow | Unit | 2 | $1.42 | $2.84 | |
| TOTAL | $405.35 | ||||
*Prices in table 1 are based on 2023 costs and may vary due to sales or promotions.
References
- Blum, W. E. (2013). Soil and land resources for agricultural production: General trends and future scenarios—a worldwide perspective. International Soil and Water Conservation Research, 1(3), 1-14.
- Brooke, N. (2015). Aquaponics supplies and materials. How to Aquaponic. Retrieved August 8, 2023 from https://www.howtoaquaponic.com/diy/aquaponics-supplies/#more-38
- Deer, C., Hu, B., Dunn, B., & Dusci, J. (2021). Nitrification and maintenance in media bed aquaponics. Extension Fact Sheets. Retrieved from https://extension.okstate.edu/fact-sheets/nitrification-and-maintenance-in-media-bed-aquaponics.html
- Go Green Aquaponics. (2023). What is a bell siphon and why we use it in aquaponics. Retrieved October 3, 2023 from https://gogreenaquaponics.com/blogs/news/what-isbell-siphon-and-why-we-use-it-in-aquaponics
- Hager, J., Bright, L., Tidwell, J., & Dusci, J. (2021). A practical handbook for growers: Aquaponics production manual.
- (n.d.). IBC Plastic Water Tote – 275 Gallons. Distillata. Retrieved March 8, 2024. https://distillata.com/product/non-potable-distilled-water-totes-275-gallons/
- USDA Agricultural Marketing Service. (2022). Aquaponic operation good agricultural practices for food safety. Retrieved October 4, 2023 from https://www.ams.usda.gov/services/auditing/gap-ghp
Acknowledgments
This material is based upon work supported by the National Institute of Food and Agriculture, U.S. Department of Agriculture, through the Northeast Sustainable Agriculture Research and Education program under subaward number LNE23-460.
Thank you to Khylah Harris, 2022 Extension Workforce Development Intern; Juliet Sodergreen, University of Maryland, College Park Research Assistant; and the Grant Advisory Committee for your contributions to this publication.
Grant advisory committee:
- Matt Parker, UMD Extension, aquaculture business planning
- Cathy Lu, UMD Extension, aquaculture food safety
- Bill Tharpe, Maryland Department of Agriculture
- Patrick Hudson, Mark Street Ventures
- Levi Seller, South Mountain MicroFARM
- Elshan Baloghlanov, Greenway Farms, and Dan Whitney
Any opinions, findings, conclusions, or recommendations expressed in this publication are those of the author(s) and do not necessarily reflect the view of the U.S. Department of Agriculture.


All photos by Andrea Franchini, University of Maryland Extension, except where noted.
ANDREA FRANCHINI
andrea1@umd.edu
JOSE-LUIS IZURSA
jlizursa@umd.edu
NEITH G. LITTLE
nglittle@umd.edu
This publication, How to Build a Low-Cost, Small-Scale Aquaponic System (EM-2023- 0698), is a part of a collection produced by the University of Maryland Extension within the College of Agriculture and Natural Resources.
The information presented has met UME peer-review standards, including internal and external technical review. For help accessing this or any UME publication contact: itaccessibility@umd.edu
For more information on this and other topics, visit the University of Maryland Extension website at extension.umd.edu
University programs, activities, and facilities are available to all without regard to race, color, sex, gender identity or expression, sexual orientation, marital status, age, national origin, political affiliation, physical or mental disability, religion, protected veteran status, genetic information, personal appearance, or any other legally protected class.
When citing this publication, please use the suggested format below:
Franchini, A., Izursa, J. L., & Little, N., (2024). How to Build a Low-Cost, Small- Scale Aquaponic System (FS-2023-0698). University of Maryland Extension. go.umd.edu/FS-2023-0698