Materials for building a salad table
(Finished dimensions - 33” wide X 58” long)
- Untreated, framing lumber: Two 2 X 4s, 10 ft. long and Two 2 X 4s, 12 ft. long
- 2 ½” galvanized deck screws
- 3/8” staples
- 1 lb. of 1 in. roofing nails
- 3 ft. X 5 ft. roll of aluminum window screening
- 3 ft. X 5 ft. roll of ½” mesh hardware cloth (This is a galvanized wire mesh that comes in a roll.)
Tools
Hand saw, square, hammer, tin snips, drill, staple gun, #2 Phillips screw bits, leather gloves, tape measure, and safety goggles.
Directions

- Cut (2) 58 in. sections from a 10 ft. 2 X 4 (long sides)
- Cut (4) 30 in. sections from the other 10 ft. 2 X 4 (cross pieces)
- Cut (4) 32.5 in. sections from a 12 ft. 2 X 4 (inside support legs)
- Cut (4) 36 in. sections from the other 12 ft. 2 X 4 (outside legs)
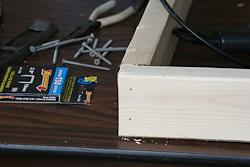
- Attach the long sides (58 in.) to the cross pieces (30 in.) using the 2 ½ in. galvanized screws (2 screws/crosspiece.) The two interior cross pieces are attached on center at 19 9/16 in. from each end of the long pieces (this makes for three equal sections that are each 30in. X 17 5/16 in).
- Center the window screen on the outside bottom of the frame. Two people are required to stretch it taut and staple it to the frame bottom and sides using a staple gun.
- Center the hardware cloth over the window screen, pull it taut, and staple it to the frame bottom. Nail roofing nails around the frame for added support. Now make a diagonal cut with tin snips at each corner of the hardware cloth. This enables you to fold it up and onto the ends of the frame where it can be stapled and nailed. (It will be difficult to attach the legs properly if the hardware cloth and window screen are folded and bunched on the sides where the legs attach.)
Build four sturdy legs by attaching each of the 32 ½ in. legs to a 36 in. leg using the
2 ½ in. galvanized wood screws.

- The table will rest on the shorter piece of each 2-piece leg. Attach the legs, 8 inches in from the four corners, by driving three 2 ½ in. screws through the top of each leg and into the long side of the frame.
Tips
Drill pilot holes with a 1/8” drill bit before driving in the galvanized screws.
- Use a wood rasp to clean up rough edges after cutting your wood pieces.
- ¼ in. hardware cloth is more expensive but easier to manipulate.
- Cover the edge of the window screen and hardware cloth on all four sides with some type of molding to prevent the fraying and poking hazard from sharp edges.
- Paint the exterior only with latex paint or an acrylic stain.
Alternative construction methods
- The Salad Table™ can be made of any width and length as long as the weight of the growing media, water, and plants can be supported.
- You can substitute 10d galvanized nails for the screws. If you prefer, you can have your lumber yard or store make the required lumber cuts. You can substitute 2 X 6 boards for a deeper growing bed (good for snap beans), or 2 X 8 boards (good for peppers, determinate-type tomatoes, and bush cucumbers.)
- Legs can be made from 4 X 4s (with a 1 ½” X 3 ½” notch cut out to support the frame) or you can set the frame on two sawhorses, or other supports. Attach sturdy casters to the legs to make it mobile!
- You can substitute 4 in. lag bolts for screws for attaching the legs (2 bolts per leg). This allows easy removal of the legs if you need to break down the Salad Table.
- You can eliminate the hardware cloth and just use an aluminum window screen for the bottom. Be sure to attach three 1 X 4 boards, each 58” long, over the window screen to prevent the bottom from sagging.
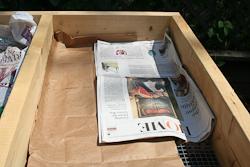
- Hardware cloth bottom with no window screen, you’ll need to cover the bottom of each section with newspaper or a paper grocery bag (photo below) to prevent the growing media from sifting out.
- You could make the frame with one divider instead of two.