Visual Guide for Using Zoom for Community Education Program
A Guide to Develop, Implement, and Assess Your Extension Program Using Zoom Platform
This guide is created to provide tips and suggestions on ways you can use the Zoom platform to implement a successful online community education program. Several well-developed Zoom tutorials are available on implementing a specific task (e.g., add a poll or add a co-host) rather than an overall process of creating an educational session.
Therefore, we decided to create a visual guide that provides step-by-step guidelines meant for Zoom-based Extension programs. This guide focuses on the “Meeting” segment of Zoom. The “Meeting” feature allows more participant interaction, group discussion, breakout room and other interactive features to allow better educational experience for the participants.
Building an online program should always start from an instructional framework to ensure well-adapted and diverse program delivery.
Table of Content
Introduction
Adapted ADDIE’s Model
Steps to Set Up Zoom Educational Program
1. Terms to Remember
1.i. Meeting vs Webinar
1.ii. Host vs Co-Host vs. Alternative host
1.iii. Waiting room vs. Breakout room
2. Pre-session/Meeting
2.i. Schedule zoom meeting
2.ii. Meeting setting
2.iii. Registration
2.iv. Create a poll for survey
3. In-Session Meeting
3.i. Participant management: Turn off participant video
3.ii.Participant management: Mute everyone
3.iii. Add a co-host
3.v. Recording options
3.vi. Breakout room: Pre-meeting setting
3.vii. Breakout room: During meeting setting
3.viii. Launching a poll
3.ix. Teach Live sessions on social media using zoom
4. Post Session/Meeting
4.i. Export poll, usage, and registration data
5. Glossary
6. Publication information, Special Credits, and Reviewer Acknowledgement
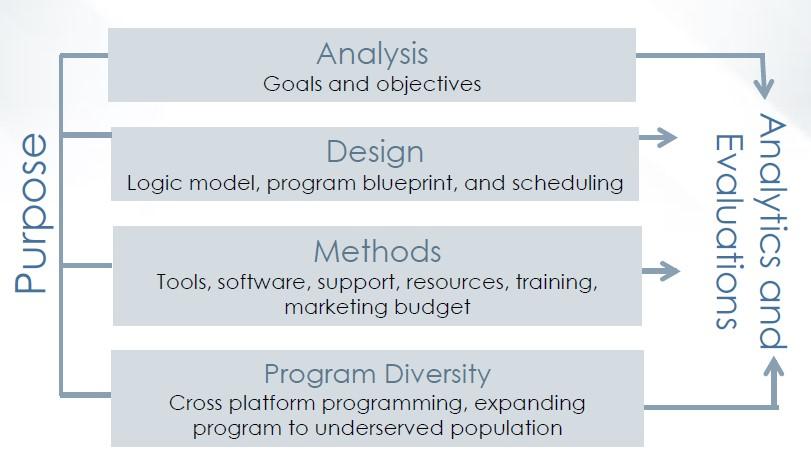
Below you can see an adaptation of the well-renowned ADDIE (Analysis, Design, Development, Implementation, and Evaluation) Model of Instructional design. ADDIE model has been used for creating instructional design and training development.
Note: Technological updates and organizational policies can affect the way your Zoom platform looks and functions. Please reach out to your Information Technology Department to address changes to the platform.
Adapted ADDIE Model
Purpose
Identifying the purpose of the program is essential to ensuring a successful online educational program and for assessing programmatic needs, team recruitment, target audience, methodology, tools, and assessment. Irrespective of the ADDIE program step you are on, it always needs to coincide with your purpose.
Analysis
This step is crucial to understand your participants, identifying their needs, and building an audience-focused educational approach. You can use several methods to gather this information, including a formal needs assessment, verbal communication, polls on social media, etc. This data will give you the most current information needed to create a program.
Design
This step includes creating a checklist of all the resources, tools, and expertise you will need to build an educational program. The design steps will also include identifying and recruiting team members (if applicable).
Methods
This step focuses on implementing and combining your checklist from the design step. By now, you most likely have
Identified team members;
Identified a funding and resource allocation plan;
Developed program design and logic model (if applicable);
Scheduled and/or implemented training and professional development;
Developed an evaluation/analytics plan;
Crafted a marketing plan and;
Created a budget (if applicable).
Program Diversity
This step can be implemented during the time of analysis and design step. It focuses on adding diversity in terms of language, audience, online platform, expansion, and cross-collaboration to reach a larger and underserved audience (e.g., adding Spanish translations, hosting sessions on social media, and working with a new collaborator).
Analytics and Evaluation
We highly encourage this step to develop a story and impacts of your work based on the resources and expertise, you can conduct formal and informal assessments/process evaluation of each steps stated above. You can consider investigating outcomes using analytics (e.g., webpage, Google, social media) to assess views, duration, and general demographics etc.
Steps to Set Up Zoom Educational Program
This guide will outline the set-up process for your program session(s) using Zoom website. The guide ONLY focuses on the “meeting” set up of Zoom. In our opinion, the “meeting” feature provides interactions and controls for teaching that otherwise will not apply with a “webinar.” If you are using Zoom desktop app, the features may look slightly different from the traditional web-version of Zoom.
Terms to Remember
I. Meeting vs. webinar
II. Host vs. co-host vs. alternative host
III. Waiting room vs. breakout room
Pre-session/meeting
I. Schedule a Zoom meeting
II. Meeting setting
III. Registration
IV. Create a poll for survey
In-session/meeting
I. Participants management (turn off camera and microphone)
II. Add a co-host(s)
III. Screen sharing
IV. Recording options
V. Breakout room: pre meeting and during meeting options
VI. Launching a poll
VII. Teach “live session” on social media using Zoom
Post-session/meeting
Export poll, usage data, and registration data
1. Terms to Remember
1.I. Meeting vs. Webinar
Meeting
It involves free and paid subscriptions. Check with your organization on the license agreement;
Allows hosting from 1-1,000 participants depending on the license;
Allows better interactions as a group at large
Allows small group discussion using breakout rooms;
Allows creating registration and closed captioning;
Allows participants to mute or unmute themselves;
Allows host, co-host, alternative host, and participants to turn on their camera;
Allows live streaming on social media such as Facebook and YouTube from the Zoom meeting.
Webinar
It involves free and paid subscriptions,and paid add-ons as a pro or higher subscriptions. Check with your organization on the license agreement.
Allows to host 11-10,000 participants depending on the license. Webinar is suitable for conferences, lectures halls or auditoriums.
Webinar has very limited interactive activities and participants cannot interact with each other.
Allows creating registration and closed captioning.
Only host and presenters and panelists can speak, and rest of the participants are always muted.
Only host and presenters and panelists can turn on their camera.
Allows live streaming on social media such as Facebook and YouTube from the Zoom meeting.
1.II. Host vs. Co-host vs. Alternative Host
The table below shows rights, responsibilities, and permissions of the roles of a host, co-host, and alternative host.
Tasks
Host
Co-host
Alternative Host
Start meeting
✓
✓
Create/edit meeting
✓
Assign co-hosts and alternative hosts
✓
Manage, block, mute, turn-off camera, and chat with participants
✓
✓
✓
Screen share
✓
✓
✓
Create registration and polls
✓
Save chat
✓
✓
✓
Launch a poll
✓
✓
Start, pause, and stop recording
✓
✓
✓
Generate reports
✓
Assign breakout rooms (pre-meeting)
✓
Assign breakout room (during meeting)
✓
✓
✓
Start computer and Cloud recording
✓
✓
✓
End meeting
✓
✓
1.III. Waiting Room vs. Breakout Room
Waiting Room
This feature is for a pre-meeting/session.
Waiting room is created for participants to wait until the host allows them to enter the meeting/session.
This is a great option while the host is preparing for the meeting/session and does not want participants to see behind-the-scenes activity. Also, it allows the host to skim through participants and stop spam participants from entering the meeting/session.
Breakout Room (exclusive to Zoom meeting not webinar)
This feature is for engaging participants during meeting/session.
It is a great tool to create smaller groups of participants for activity or discussion.
You can create breakout rooms before or during a meeting/session with your participants.
2. Pre-session/Meeting
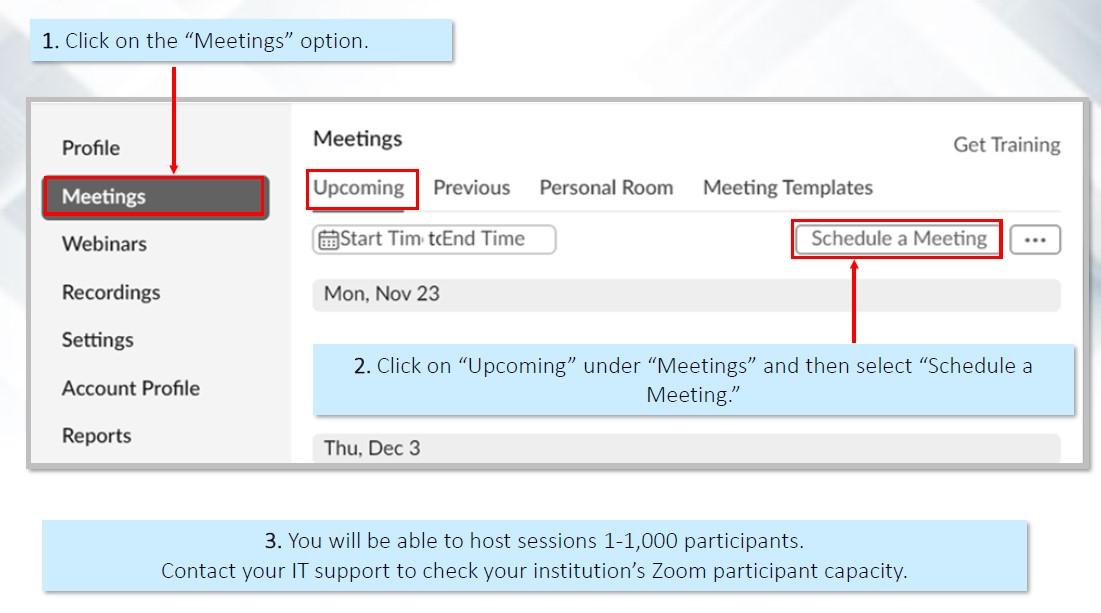
2.I. Schedule a Zoom Meeting
Click on the “Meetings” option.
Click on “Upcoming” under “Meetings” and then select “Schedule a Meeting.”
You will be able to host sessions 1-1,000 participants.
Contact your IT support to check your institution’s Zoom participant capacity.
2.II. Meeting Setting
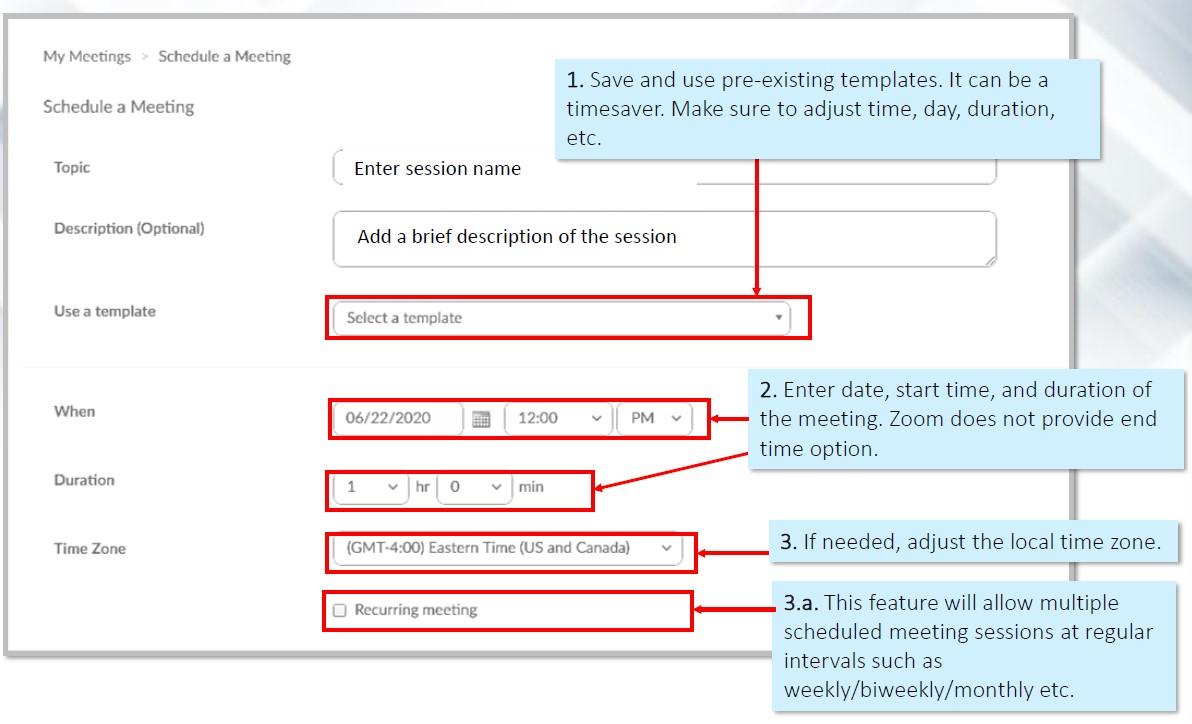
Save and use pre-existing templates. It can be a time saver. Make sure to adjust time, day, duration,etc.
Enter date, start time, and duration of the meeting. Zoom does not provide end time option.
If needed, adjust the local time zone.
This feature will allow multiple scheduled meeting sessions at regular intervals such as weekly/biweekly/monthly etc.
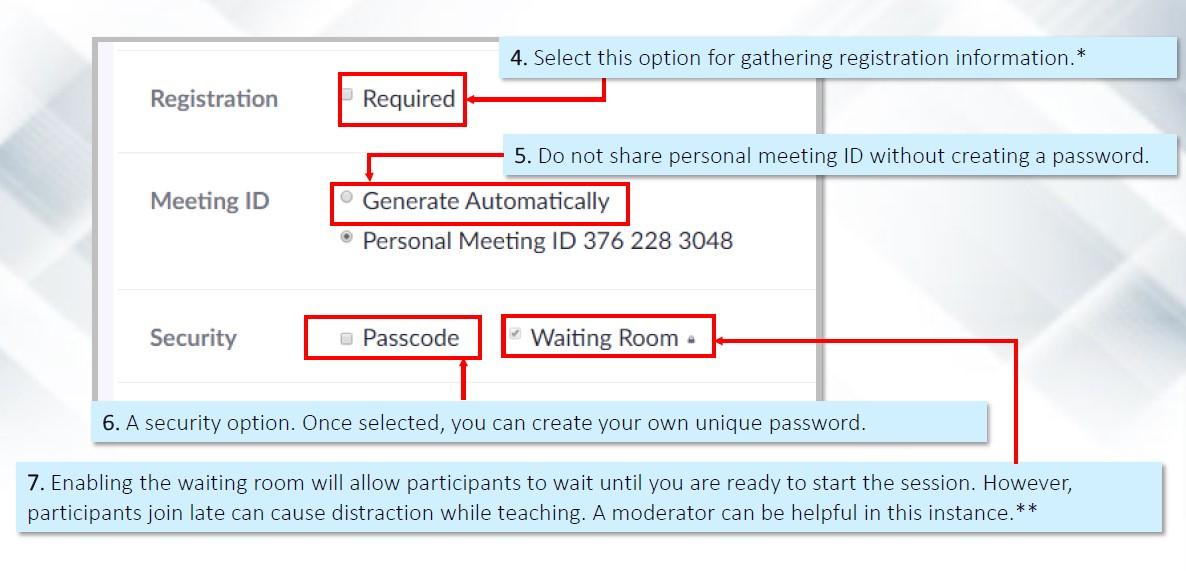
Select this option for gathering registration information.*
Do not share personal meeting ID without creating a password.
A security option. Once selected, you can create your own unique password.
Enabling the waiting room will allow participants to wait until you are ready to start the session. However,participants join late can cause distraction while teaching. A moderator can be helpful in this instance.**
Note: *You can collect demographics using registration form. **Some universities may keep waiting room as a mandatory option and you may not be able to unselect this option.Check with your IT department.
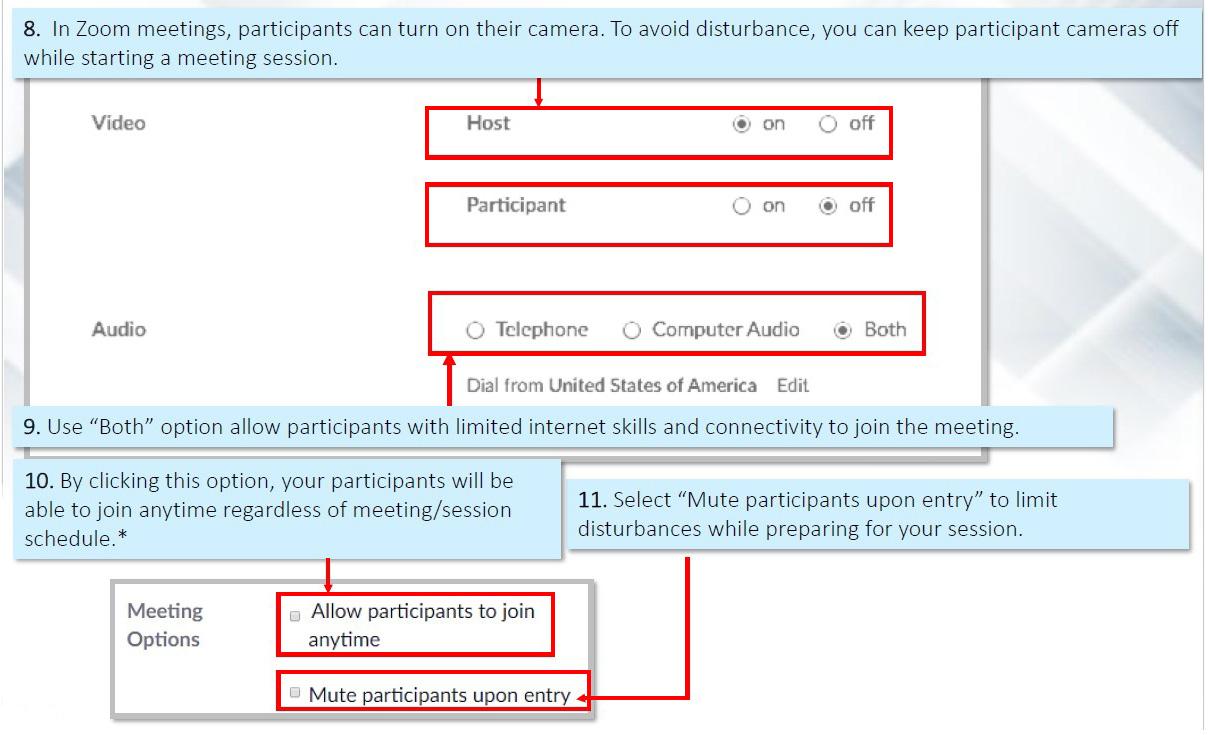
In Zoom meetings, participants can turn on their camera. To avoid disturbance, you can keep participant cameras off while starting a meeting session.
Use “Both” option allow participants with limited internet skills and connectivity to join the meeting.
By clicking this option, your participants will be able to join anytime regardless of meeting/session schedule.*
Select “Mute participants upon entry” to limit disturbances while preparing for your session. Note: *Recommendation: We suggest not selecting this option so you to prep for your session without distraction by participants.
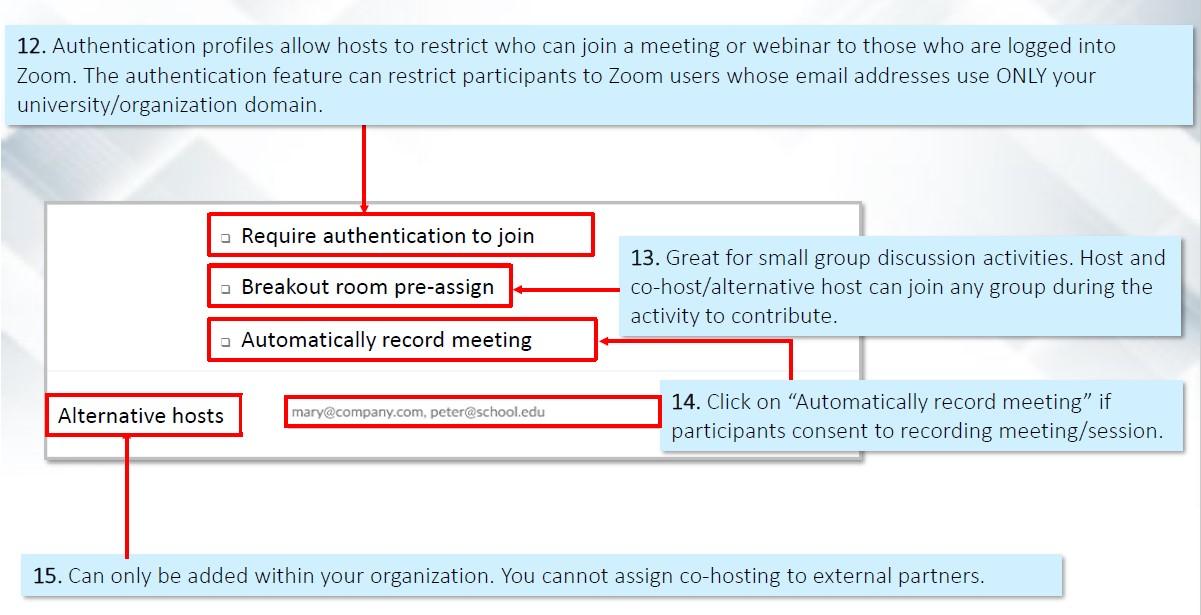
Authentication profiles allow hosts to restrict who can join a meeting or webinar to those who are logged into Zoom. The authentication feature can restrict participants to Zoom users whose email addresses use ONLY your university/organization domain.
Great for small group discussion activities. Host and co-host/alternative host can join any group during the activity to contribute.
Click on “Automatically record meeting” if participants consent to recording meeting/session.
Can only be added within your organization. You cannot assign co-hosting to external partners.
Note: The host can pre-assign breakout rooms based on email addresses and/or preregistrations.The name of the breakout room can be changed. This may be helpful when setting up participants into breakout rooms. Both these points will be discussed in detail in the section 3.vi. And 3.vii.
2.III. Registration
Registration will allow host to collect two crucial program information.
Demographics (e.g., age, race, gender)
Pre-survey
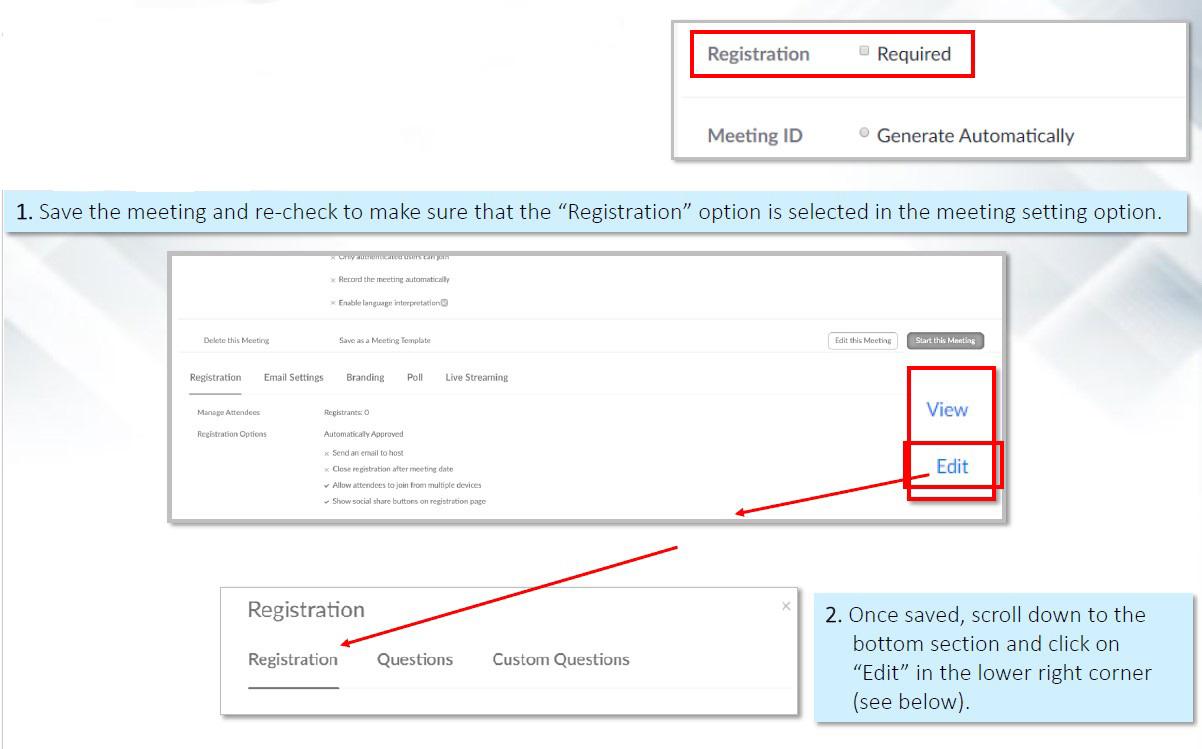
Save the meeting and re-check to make sure that the “Registration” option is selected in the meeting setting option.
Once saved, scroll down to the bottom section and click on“Edit” in the lower right corner(see below).
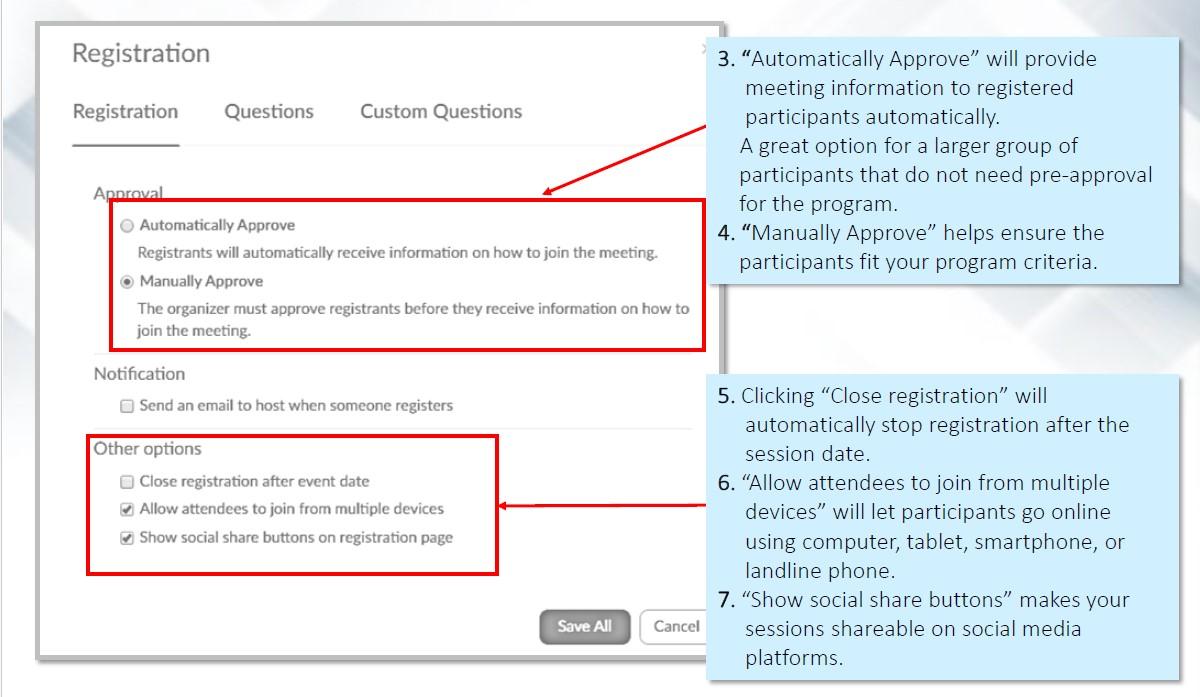
“Automatically Approve” will provide meeting information to registered participants automatically. A great option for a larger group of participants that do not need pre-approval for the program.
“Manually Approve” helps ensure the participants fit your program criteria.
Clicking “Close registration” will automatically stop registration after the session date.
“Allow attendees to join from multiple devices” will let participants go online using computer, tablet, smartphone, or landline phone.
“Show social share buttons” makes your sessions shareable on social media platforms.
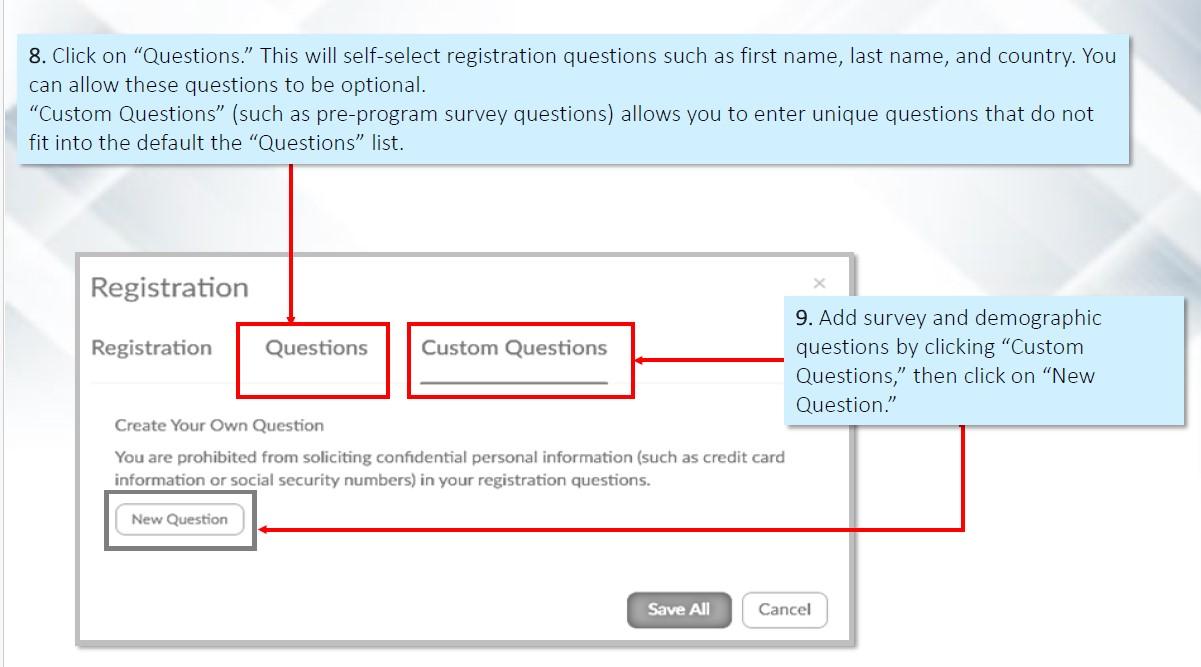
Click on “Questions.” This will self-select registration questions such as first name, last name, and country. You can allow these questions to be optional. “Custom Questions” (such as pre-program survey questions) allows you to enter unique questions that do not fit into the default the “Questions” list.
Add survey and demographic questions by clicking “Custom Questions,” then click on “New Question.”
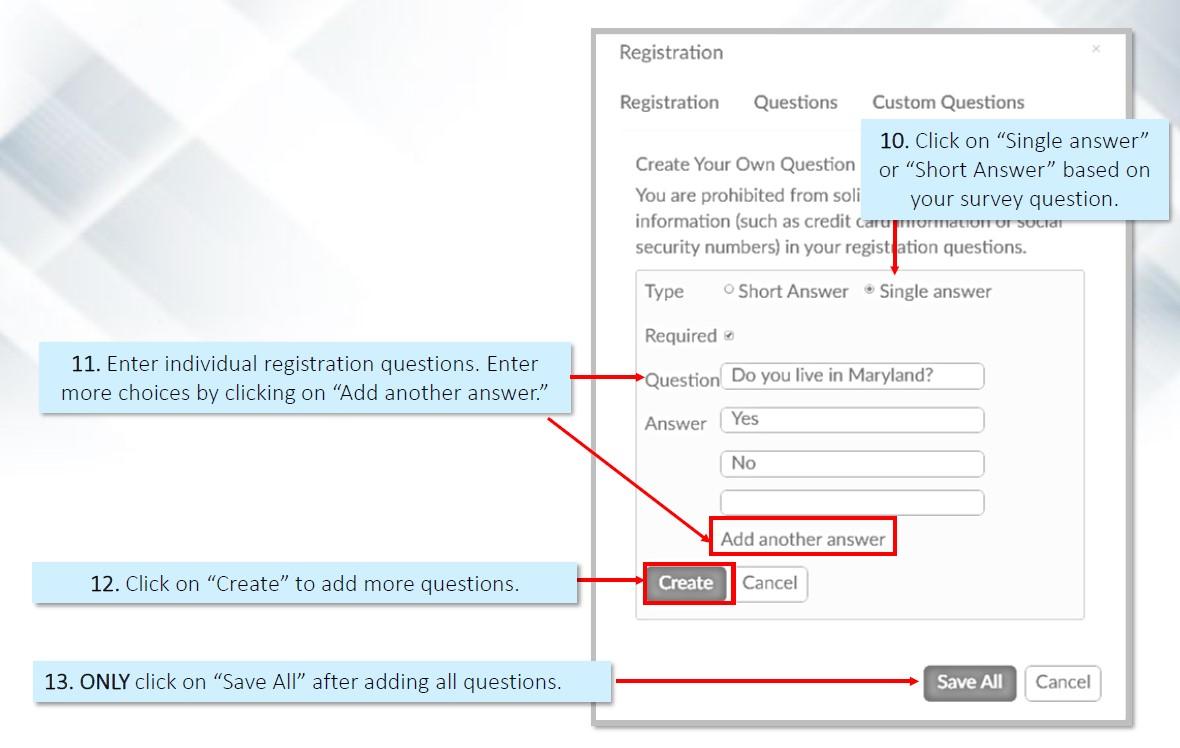
Click on “Single answer”or “Short Answer” based on your survey question.
Enter individual registration questions. Enter more choices by clicking on “Add another answer.”
Click on “Create” to add more questions.
ONLY click on “Save All” after adding all questions.
2.IV. Create a Poll for Survey
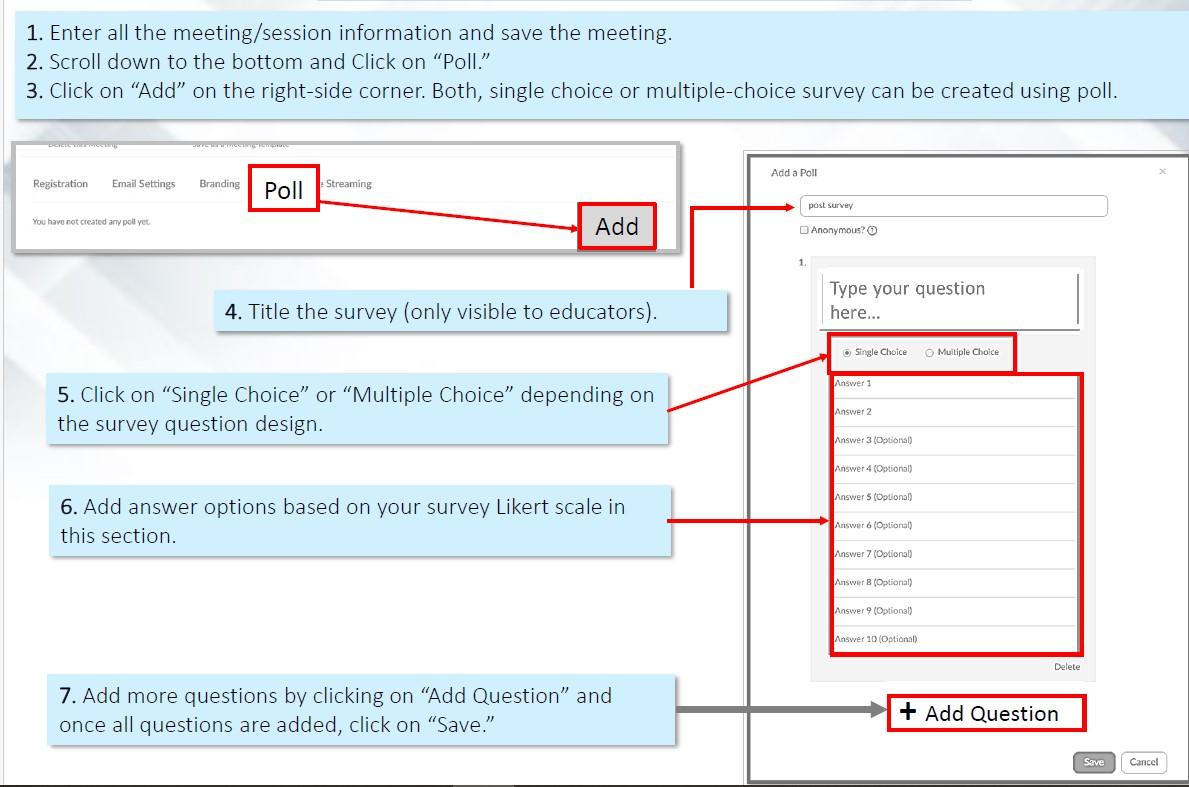
Enter all the meeting/session information and save the meeting.
Scroll down to the bottom and Click on “Poll.”
Click on “Add” on the right-side corner. Both, single choice or multiple-choice survey can be created using poll.
Title the survey (only visible to educators).
Click on “Single Choice” or “Multiple Choice” depending on the survey question design.
Add answer options based on your survey Likert scale in this section.
Add more questions by clicking on “Add Question” and once all questions are added, click on “Save.”
3. In-session/Meeting
Before starting a session, provide these guidelines to your participants.
Announce when you will be addressing participants’ questions and comments and encourage them to enter their questions in the chat box (e.g., in the middle of session, end of the session). This will keep you from getting distracted while teaching.
Let participants know they will be muted to avoid interruptions. Also inform them when you are about to unmute for questions and comments.
Ask your audience to turn off their camera and show them how to do it. If you still see a participant’s camera on,you can shut off their camera. See how to do that in the screenshot below.
Indicate when you will launch a poll survey.
3.I. Participant Management: Turn Off Participants’ Video
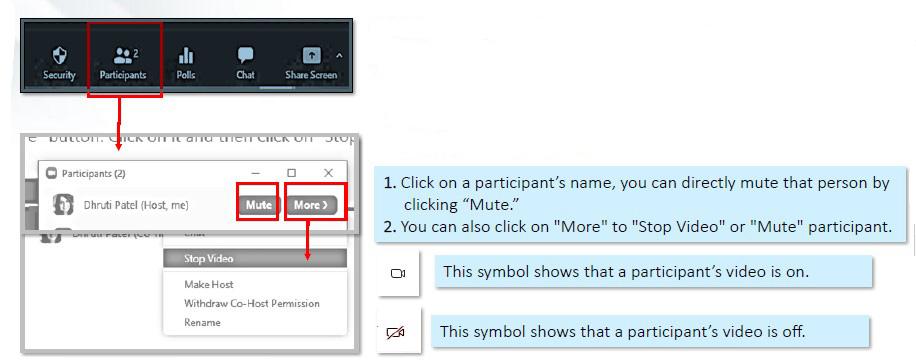
Click on the participants tab in the bottom section of the meeting screen.
In the participants' panel, you will see a camera sign next to each participant's name. If their camera is turned on, hover over the participant's name, and it will show a "more“ button. Click on it and then click on "Stop Video."
Click on a participant’s name, you can directly mute that person by clicking “Mute.”
You can also click on "More" to "Stop Video" or "Mute" participant.
This symbol shows that a participant’s video is on.
This symbol shows that a participant’s video is off.
3.II. Participants Management: Mute Everyone
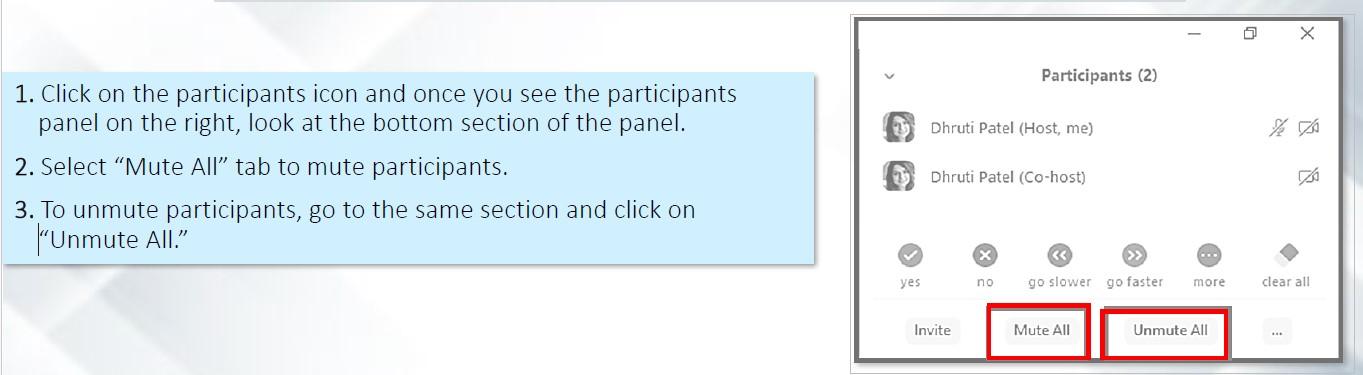
Click on the participants icon and once you see the participants panel on the right, look at the bottom section of the panel.
Select “Mute All” tab to mute participants.
To unmute participants, go to the same section and click on“Unmute All.”
3.III. Add a Co-Host(s)
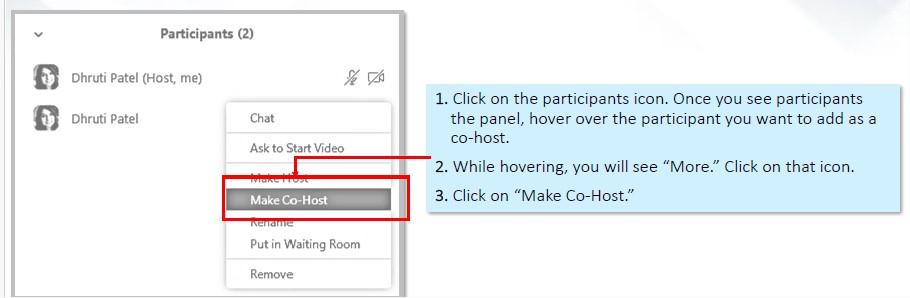
Click on the participants icon. Once you see participants the panel, hover over the participant you want to add as a co-host.
While hovering, you will see “More.” Click on that icon.
Click on “Make Co-Host.”
3.IV. Screen Sharing
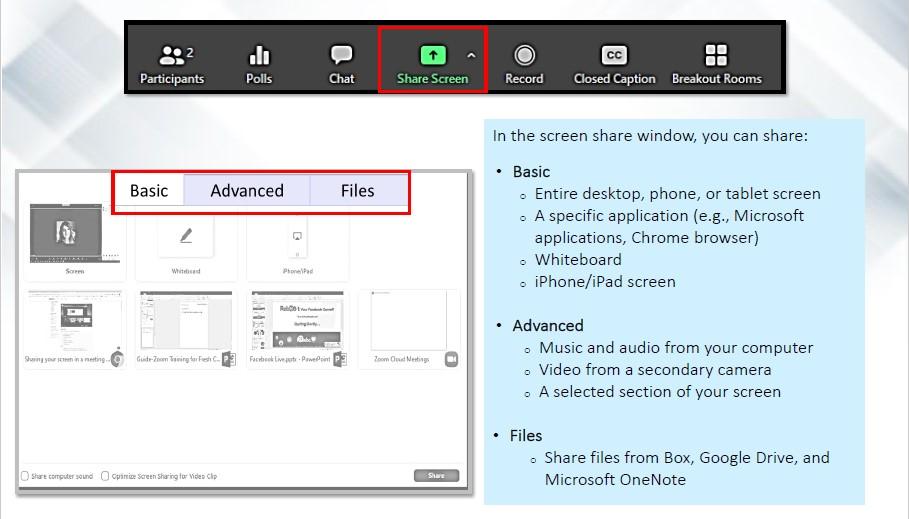
Click on the “Screen Share” in the bottom panel of your meeting screen.
In the screen share window, you can share:
Basic
Entire desktop, phone, or tablet screen
A specific application (e.g., Microsoft applications, Chrome browser)
Whiteboard
iPhone/iPad screen
Advanced
Music and audio from your computer
Video from a secondary camera
A selected section of your screen
Files
Share files from Box, Google Drive, and Microsoft OneNote
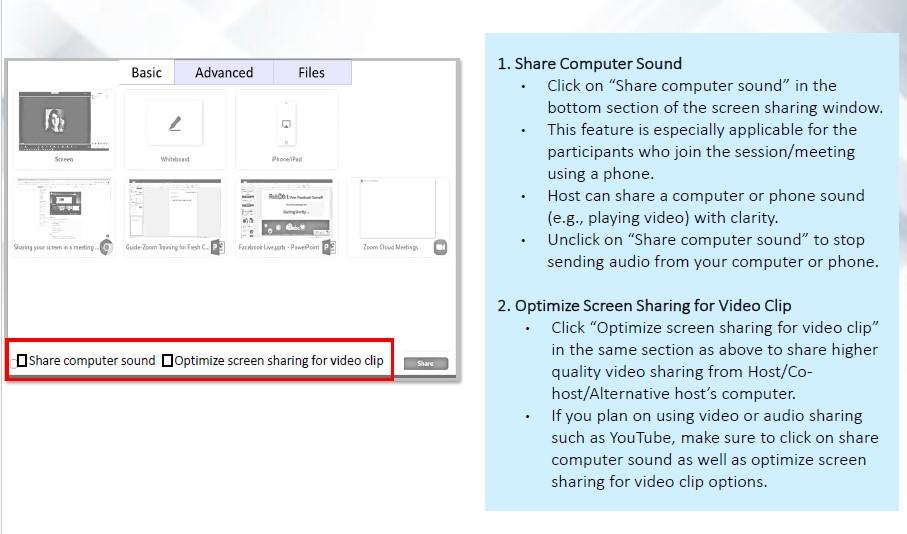
Share Computer Sound
Click on “Share computer sound” in the bottom section of the screen sharing window.
This feature is especially applicable for the participants who join the session/meeting using a phone.
Host can share a computer or phone sound(e.g., playing video) with clarity.
Unclick on “Share computer sound” to stop sending audio from your computer or phone.
Optimize Screen Sharing for Video Clip
Click “Optimize screen sharing for video clip”in the same section as above to share higher quality video sharing from Host/Co-host/Alternative host’s computer.
If you plan on using video or audio sharing such as YouTube, make sure to click on share computer sound as well as optimize screen sharing for video clip options.
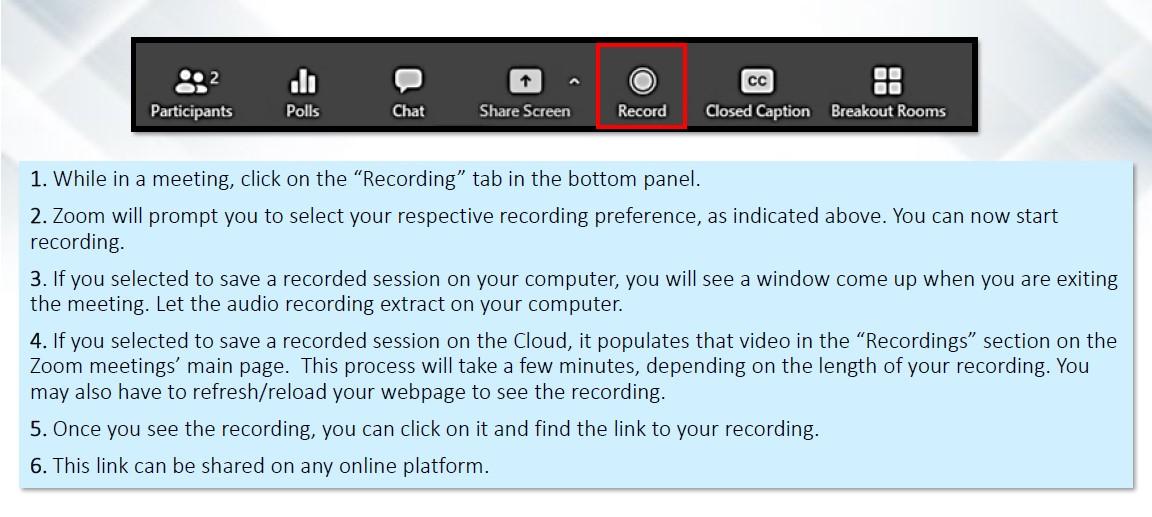
3.V. Recording Options
You can record your session on your computer or in the Zoom Cloud.
Recording a session on the Cloud can help if you intend to make the session available after the scheduled date.
You can also make your recording available to your audience through shared drives such as Google drive, box, or Drive box etc.
While in a meeting, click on the “Recording” tab in the bottom panel.
Zoom will prompt you to select your respective recording preference, as indicated above. You can now start recording.
If you selected to save a recorded session on your computer, you will see a window come up when you are exiting the meeting. Let the audio recording extract on your computer.
If you selected to save a recorded session on the Cloud, it populates that video in the “Recordings” section on the Zoom meetings’ main page. This process will take a few minutes, depending on the length of your recording. You may also have to refresh/reload your webpage to see the recording.
Once you see the recording, you can click on it and find the link to your recording.
This link can be shared on any online platform.
3.VI. Breakout Room: Pre-meeting Setting
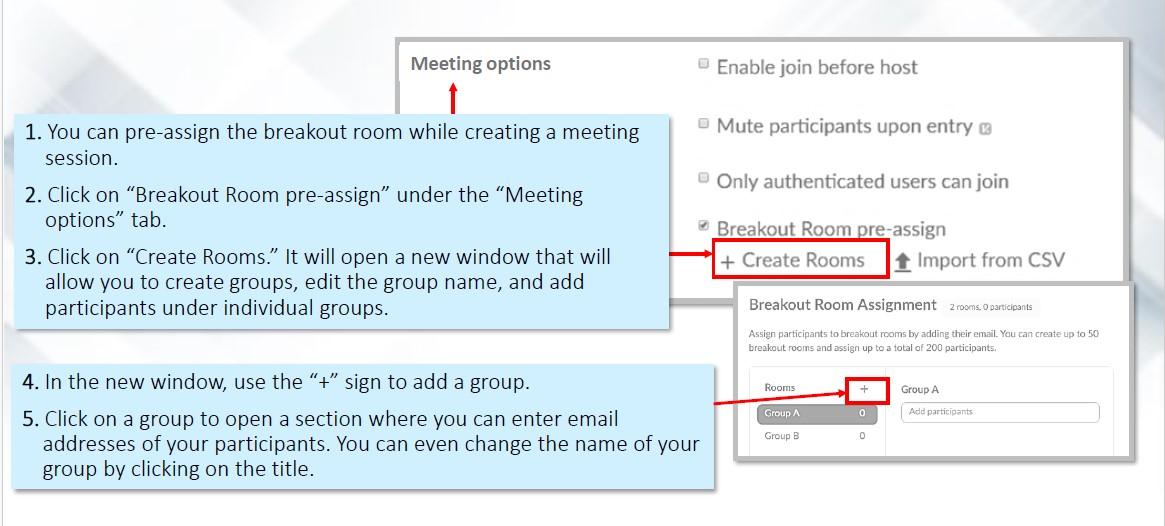
You can pre-assign the breakout room while creating a meeting session.
Click on “Breakout Room pre-assign” under the “Meeting options” tab.
Click on “Create Rooms.” It will open a new window that will allow you to create groups, edit the group name, and add participants under individual groups.
In the new window, use the “+” sign to add a group.
Click on a group to open a section where you can enter email addresses of your participants. You can even change the name of your group by clicking on the title.
Note: To do pre-meeting breakout room setup, you need to have a list of registrations or know who will be attending to do this.
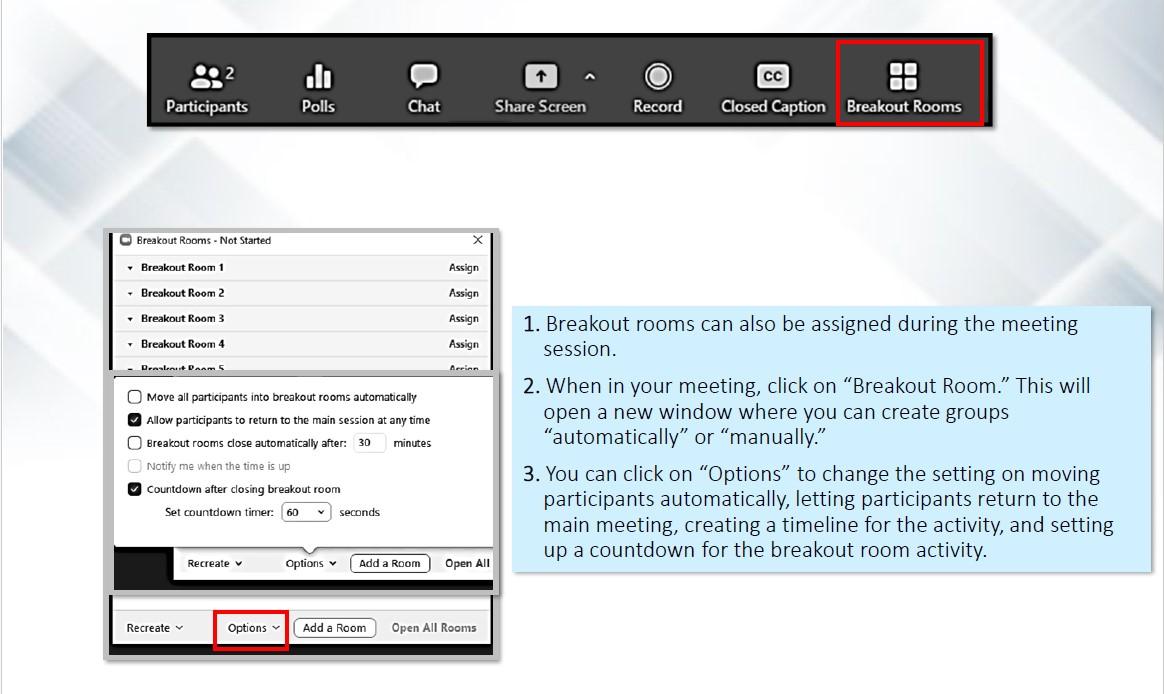
3.VII. Breakout Room: During Meeting Setting
Breakout rooms can also be assigned during the meeting session.
When in your meeting, click on “Breakout Room.” This will open a new window where you can create groups“automatically” or “manually.”
You can click on “Options” to change the setting on moving participants automatically, letting participants return to the main meeting, creating a timeline for the activity, and setting up a countdown for the breakout room activity.
3.VIII. Launching a Poll
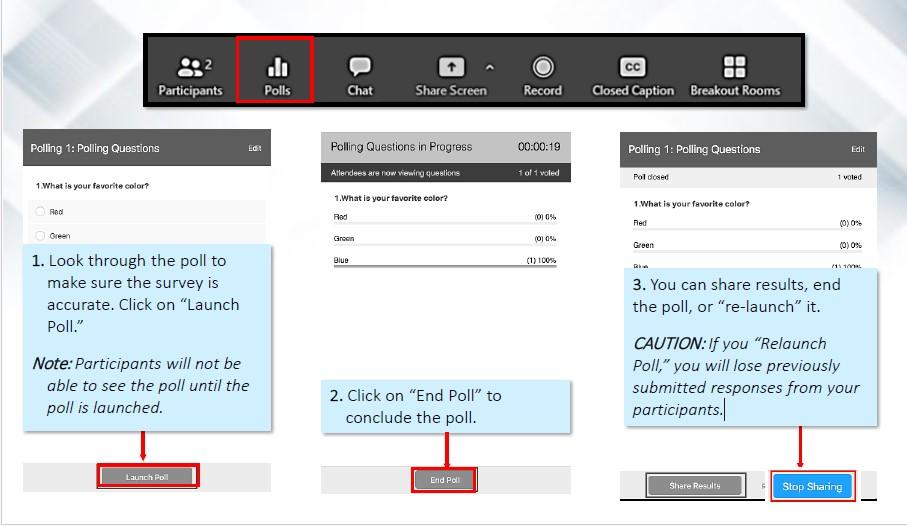
Click on the “Polls” in the bottom panel of your meeting screen, and a new window will appear with your survey poll already created. Poll reports are collected on Zoom website and can be downloaded. For more details see section 4.
Look through the poll to make sure the survey is accurate. Click on “Launch Poll.” Note: Participants will not be able to see the poll until the poll is launched.
Click on “End Poll” to conclude the poll.
You can share results, end the poll, or “re-launch” it. CAUTION: If you “Relaunch Poll,” you will lose previously submitted responses from your participants.
3.IX. Teach “Live Session” on Social Media Using Zoom
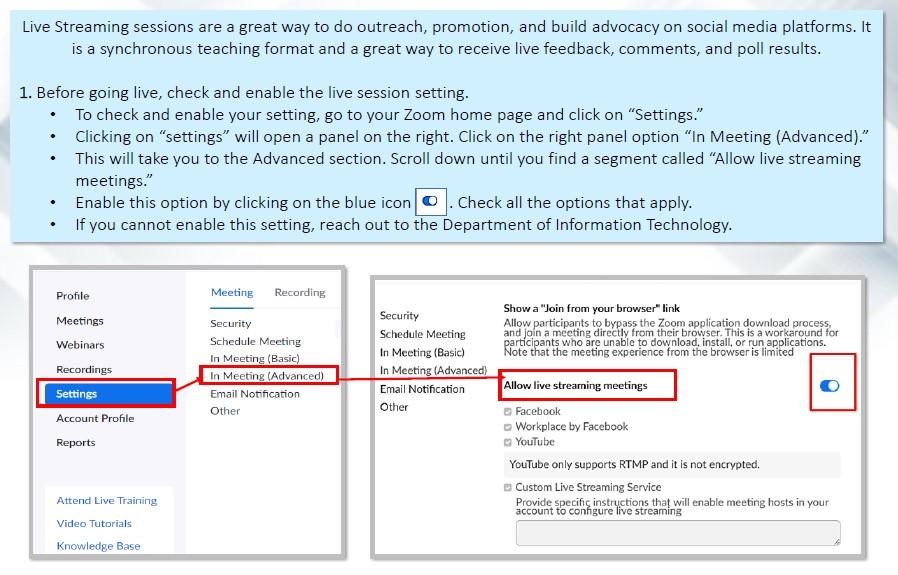
Live Streaming sessions are a great way to do outreach, promotion, and build advocacy on social media platforms. It is a synchronous teaching format and a great way to receive live feedback, comments, and poll results.
Before going live, check and enable the live session setting.
To check and enable your setting, go to your Zoom home page and click on “Settings.”
Clicking on “settings” will open a panel on the right. Click on the right panel option “In Meeting (Advanced).”
This will take you to the Advanced section. Scroll down until you find a segment called “Allow live streaming meetings.”
Enable this option by clicking on the blue icon . Check all the options that apply.
If you cannot enable this setting, reach out to the Department of Information Technology.
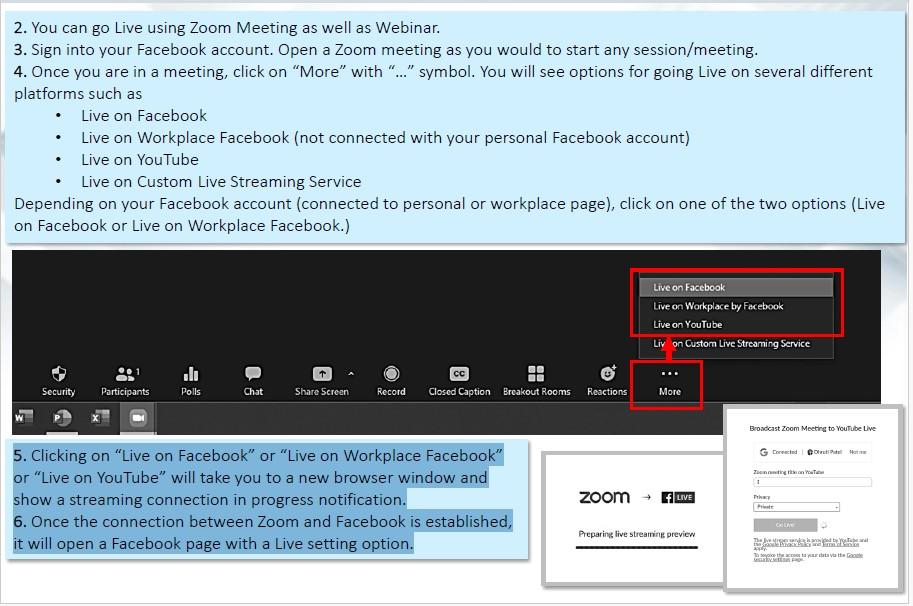
You can go Live using Zoom Meeting as well as Webinar.
Sign into your Facebook account. Open a Zoom meeting as you would to start any session/meeting.
Once you are in a meeting, click on “More” with “…” symbol. You will see options for going Live on several different platforms such as
Live on Facebook
Live on Workplace Facebook (not connected with your personal Facebook account)
Live on YouTube
Live on Custom Live Streaming Service
Depending on your Facebook account (connected to personal or workplace page), click on one of the two options (Live on Facebook or Live on Workplace Facebook.)
Clicking on “Live on Facebook” or “Live on Workplace Facebook”or “Live on YouTube” will take you to a new browser window and show a streaming connection in progress notification.
Once the connection between Zoom and Facebook is established,it will open a Facebook page with a Live setting option.
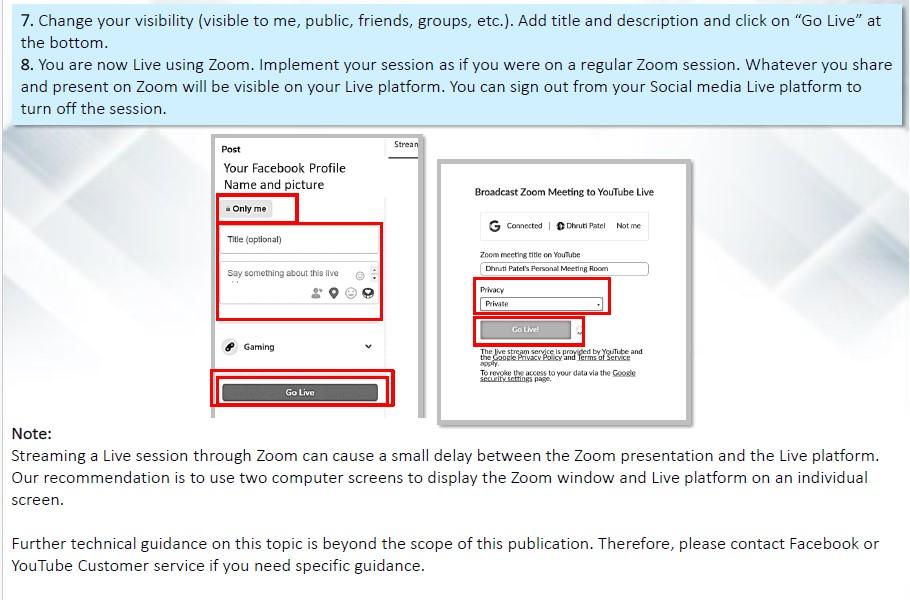
Change your visibility (visible to me, public, friends, groups, etc.). Add title and description and click on “Go Live” at the bottom.
You are now Live using Zoom. Implement your session as if you were on a regular Zoom session. Whatever you share and present on Zoom will be visible on your Live platform. You can sign out from your Social media Live platform to turn off the session.
Note: Streaming a Live session through Zoom can cause a small delay between the Zoom presentation and the Live platform. Our recommendation is to use two computer screens to display the Zoom window and Live platform on an individual screen.
Further technical guidance on this topic is beyond the scope of this publication. Therefore, please contact Facebook or YouTube Customer service if you need specific guidance.
4. Post-Session/Meeting
Export Poll, Usage, and Registration Data
Conclude the meeting, go back to the session main page of the Zoom.
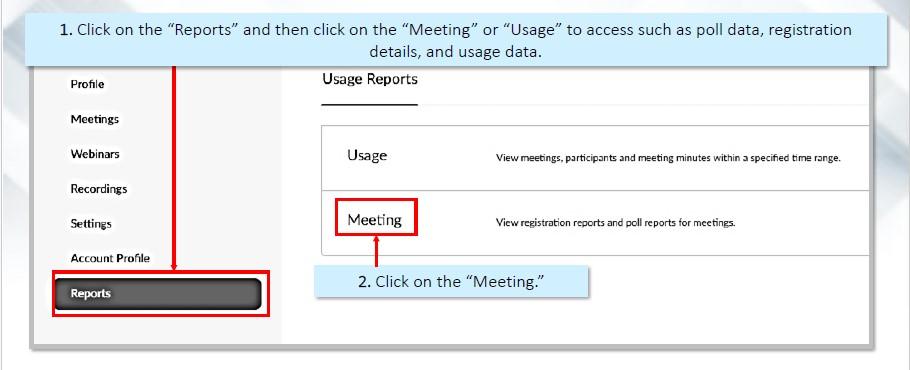
Click on the “Reports” and then click on the “Meeting” or “Usage” to access such as poll data, registration details, and usage data.
Click on the “Meeting.”
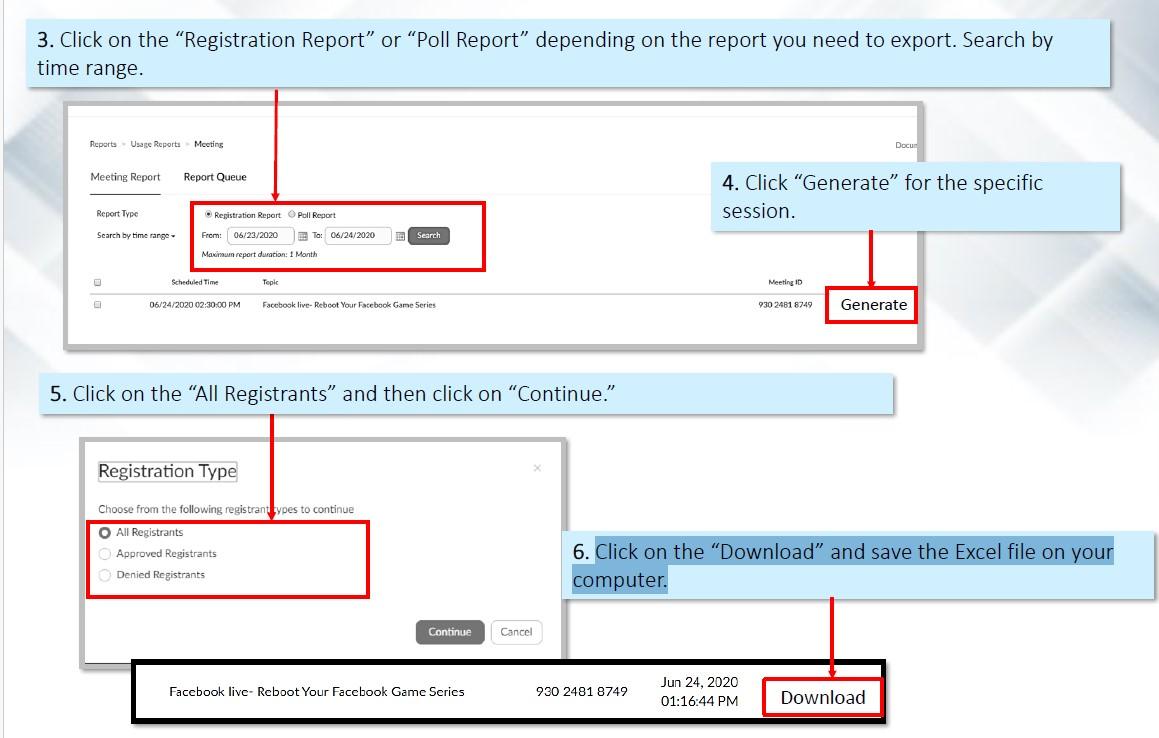
Click on the “Registration Report” or “Poll Report” depending on the report you need to export. Search by time range.
Click “Generate” for the specific session.
Click on the “All Registrants” and then click on “Continue.”
Click on the “Download” and save the Excel file on your computer.
Glossary
Terms
Explanation
ADDIE’s model
The ADDIE model is general process used by instructional designers and training developers to Analysis, Design, Development, Implementation, and Evaluation educational programs.
Breakout room
Breakout rooms are groups created while conducting a Zoom meeting format sessions. The groups can be created before the session and during the sessions.
Cloud recording
This form of recording records sessions on the Zoom platform after the conclusion of the session. This form of recording can be made available for any individuals who wants to access the meeting in a later time by a shareable link.
Computer recording
This recording is downloaded as a computer file after the session ends. This form of recording cannot be shared for later access. To make this form of recording shareable, host needs to upload it on a shared drives such as Google drive.
Community education programs
Educational programs that promotes social change and wellbeing of individuals and groups.
Export Poll
Extracting/downloading poll results collecting during sessions to the host computer.
Extension programs
The body of land grant universities which provides evidence-based information to local communities and individuals.
Live sessions
Zoom allows hosts to stream Facebook and YouTube Live sessions by creating an interface where your Zoom session can broadcast as a live session on respective social media platforms.
Meeting ID
The meeting ID is the meeting number associated with a specific scheduled meeting. It is a unique number generated to for individual/reoccurring meetings.
Meeting (Zoom)
Meetings provides interactive and collaborative experience to all participants, Meetings allows group discussions, video and audio interactions, share responses in chats.
Optimize screen sharing for video clip
This feature is part of screen sharing window that allows optimization of video shared with attendees.
Personal meeting ID
A personal meeting ID is a permanent virtual room assigned to a Zoom member. It should not be shared with attendees.
Poll
Poll is a quick survey or pulse check that can be implemented during a meeting session. Host can also create an anonymous poll using this feature.
Registration
Registration is collected before the session starts. It is a form a host can use to collect information about the attendees. It can be used to collect pre-surveys and demographic information (age, gender, race etc.).
Screen sharing
Screen sharing features allows hosts/co-host/alternative hosts to share a segment of their screen such as videos, PowerPoints, apps, shared drives(google Drive), audio, browsers etc.
Share computer sound
This feature allows clearer sounds played on the computer. If this feature is not enabled, the sound shared will not be as clear as it will be captured using host microphone and not directly from a computer.
Usage data
The Usage report allows a host to view a list of meetings, participants, duration of time a participant attended the session.
Waiting room
Waiting room provide a virtual space for attendees to wait before the session starts. Host/alternative host/co-host have access to allow attendees to join when they are ready to start the session/meeting.
Webinar (Zoom)
Webinars are implemented by host and designated panelists who shares their video, audio and screen. Webinars does not permit group communications or participant video or audio integrations. They can only participate via Q&A, Chat, and polling questions.
Zoom alternative host
Alternative hosts can do everything a co-host can. In addition, they can start and conclude the meeting. They cannot schedule a meeting. Alternative host(s) needs to be assigned by the host.
Zoom Co-host
Co-hosts are assigned role provided by the host. Co-host share many of the controls that hosts have, allowing the co-host to manage the administrative side of the webinar/meeting, such as managing attendees or starting/stopping the recording.
Zoom host
Host is a creator and scheduler of Zoom meeting/webinar. They have an ultimate access to conduct zoom sessions, assign roles (co-host, alternative hosts, panelists), cancel sessions, gather poll and registrations, and record sessions.
Special Acknowledgement to the Publication Reviewers
Kim Clark, Associate Extension Educator Dairy Systems, University of Nebraska-Lincoln
Brad Paleg, Education Technologist-Information & Education Technology, University of Maryland
Ann Taekar, CAFES Grant Program Coordinator, South Dakota State University
DHRUTI PATEL
dhrutip@umd.edu
MONA HABIBI
mhabibi@umd.edu
This publication, Visual Guide for Using Zoom for Community Education Program (EM-9), is a part of a collection produced by the University of Maryland Extension within the College of Agriculture and Natural Resources.
The information presented has met UME peer-review standards, including internal and external technical review. For help accessing this or any UME publication contact: itaccessibility@umd.edu
For more information on this and other topics, visit the University of Maryland Extension website at extension.umd.edu.
University programs, activities, and facilities are available to all without regard to race, color, sex, gender identity or expression, sexual orientation, marital status, age, national origin, political affiliation, physical or mental disability, religion, protected veteran status, genetic information, personal appearance, or any other legally protected class.
When citing this publication, please use the suggested format below:
Patel, D. & Habibi, M. (2021). Visual Guide for Using Zoom for Community Education Program (EM-9). University of Maryland Extension. https://extension.umd.edu/resource/visual-guide-using-zoom-community-education-program-em-9/.